
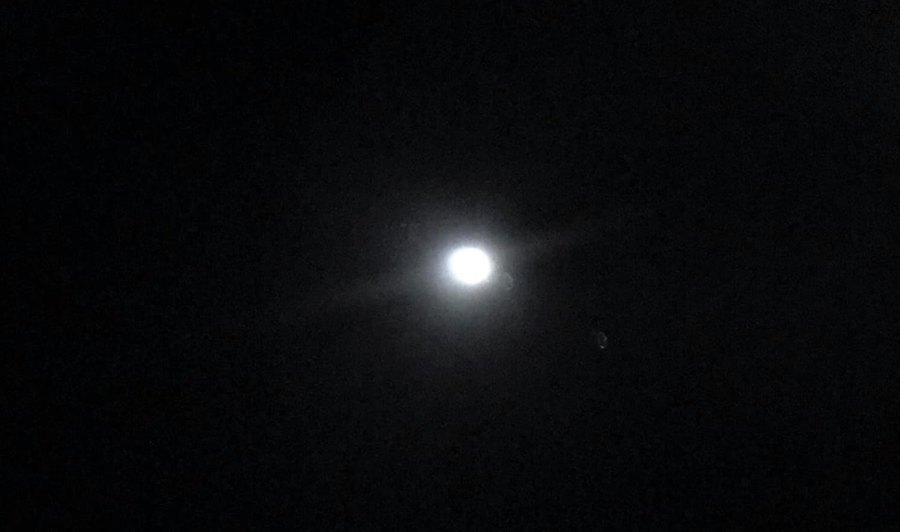
There are times when, despite our best efforts, the telescope images that greet our eyes are frustratingly blurry. This can turn the otherwise magical experience into one of confusion and disappointment.
The reasons for blurry images through a telescope can range from simple, easily correctable issues to more complex challenges. From my own experience, most often, the culprits are straightforward and easily addressed like the ones below:
- First and foremost, make sure your telescope’s front cover is off. If you’re wondering why you’re only seeing a vast field of darkness, this might be the culprit.
- Also, your objective lens (or mirror) should be pointing towards the sky. That means that if you have a reflector telescope, the big shiny thing at the bottom of the tube (primary mirror) should have the shiny side up and the frosty glass bit (secondary mirror) facing the ground. This is, in fact, a commonly missed step that has ruined many a first night of stargazing.
- Another oversight, especially among beginners, is trying to observe without inserting an eyepiece. Doing this is a bit like trying to enjoy a movie from outside the theater—you’re going to miss out on a lot!
Besides the obvious need to point your telescope at the sky and pop in an eyepiece, I believe the top five reasons for those less-than-perfect views usually boil down to:
- Observing Through Windows & Doors
- Focus Issues: Sometimes, the solution to a less-than-sharp image is as simple as adjusting your telescope’s focus knob. Ensuring your telescope is correctly focused can make all the difference.
- Too Much Magnification for the Telescope
- Inherent Telescope/Eyepiece Flaws: Not all telescopes or their accessories are created equal. Some cheap designs might just have bad views from flawed optics at the outset.
- Collimation & Cooldown: Your optics need to be aligned and at the right temperature to produce sharp images. I’ve seen far too many overlooking this feature.
Other factors that can influence the clarity of your view include edge-of-field aberrations, a tilted focuser train, chromatic aberration (which can even be present in high-end gear), poorly supported lenses/mirrors e.t.c. And, in rare instances, your own eyes can play a role, though you’re unlikely to be unaware of this one.
Before delving deep into the reasons for telescope blurriness, it’s imperative to remember the foundational elements of using a telescope. Sometimes, a sub-par stargazing experience isn’t caused by an optical flaw but by a simple oversight or limitation of the equipment itself.
Steady Observing: Defeating Telescope Shake
I see vibrations as a telescope’s worst enemy. Even a slight shake, whether from the wind, an unsteady mount, or just the act of focusing, can turn our image into a blurry mess. To mitigate much of it, I always ensure that my telescope is standing on a stable ground and that I’m using a sturdy mount.
The same goes for making sure that my telescope stays where I’ve aimed it by locking clutches (if possible), balancing the mount, and enabling any motorized tracking if I wish.
While it’s a harsh reality, not all telescopes and mounts are made to the same standard. Some low-quality units (or a damaged/incorrectly assembled telescope) can introduce challenges that no amount of user skill can overcome. I’m not saying that you’ve got to have the most expensive equipment to enjoy the skies, but understanding the limitations of your gear is crucial.
For newcomers to astronomy, affordable options can still offer rewarding experiences. For under $50, you can get binoculars suitable for stargazing, though they might be shaky without stabilization. If you’re set on a telescope, there are commendable choices available for under $200.
Dust & Dings: The Surprising Resilience of Telescope Optics
The cleanliness of your telescope’s optics might be a concern that has crossed your mind. After all, with regular use and exposure to the elements, it’s quite natural for mirrors, lenses, and other optical surfaces to gather dust, pollen, or even smudges.
Surprisingly, dirty optics don’t usually cause a telescope’s view to be blurry. Instead, dust or dirt on your telescope’s optical components typically results in dimming of the observed object. You might also notice increased glare or halos around bright celestial objects. If there are chips or scratches on mirrors, while they can be a bit alarming to see, they generally only lead to glare. I often mask off these imperfections effectively with a black marker or nail polish to minimize their impact.
While maintaining clean optics is a good practice, they’re more resilient than we might give them credit for.
A testament to this resilience I know is the famed McDonald Observatory, where the giant 107” telescope bears multiple bullet holes from a past incident. Even with such damage, the telescope’s performance remained mostly unaffected, only introducing a bit of glare and losing less than 2% of its light-gathering ability (down to a 106” equivalent aperture).
Amateur astronomers that I see at star parties frequently expose kits worth more than some homes to weeks’ worth of mud, dirt, dew, and dust every year. The James Webb Space Telescope even took a direct blow from a meteroid and was still unaffected.
So Why Is Your Telescope Blurry?
- 1. Do not look through a window!
- 2. Your telescope isn't focused
- 3. You may be using too much magnification
- 4. Your scope is just badly designed
- 5. Collimation Issues
- 6. Your telescope isn't thermally optimized
- 7. Edge-of-field aberrations and chromatic aberration
- 8. Tilted focuser train
- 9. Improperly made or adjusted optics & supports
- 10. Your Own Eyes Might Be a Culprit
1. Do not look through a window!
Just as a window pane can distort our everyday views, it can also interfere with our astronomical observations. Always try to observe directly, avoiding any barriers between your telescope and the sky. A lot of people are embarrassed to admit they’ve made this mistake, but fear not. It happens to us all.
2. Your telescope isn’t focused
First off, let’s tackle a common confusion. The focuser that holds the eyepiece on your telescope isn’t a magical “zoom” button. Instead, it’s designed to bring your celestial target into sharp clarity. Think of it more like the focus dial on binoculars, rather than the zoom on your phone’s camera.
While it might seem obvious, many times the primary culprit behind a blurry image is a telescope that’s simply out of focus.
- Day vs night focus: The focus point of your telescope on distant celestial objects is not the same as when it’s aimed at nearby terrestrial ones. If you lined up your finderscope during the day using a nearby terrestrial target, you’ll need to rack the focus of both your telescope and finderscope a bit inward for viewing the night sky.
- Start by focusing on a bright star: It’s easier to determine sharpness on a point of light like a star. Once the star appears as a sharp point, your telescope is in focus for observing other objects and should stay that way.
- Rough or stiff focusers: Some telescopes’ focusers can be a little rough and hard to dial in precisely for a sharp view at higher magnifications. Usually, what I do to solve these is greasing the focuser, adjusting any grub screws’ tightness, and removing any dirt or debris that might be clogging any moving parts. Alternatively, adding a lever attachment, a wider focus knob, or replacing your telescope’s focuser altogether would work too.
Inadequate Focus Travel
Sometimes, a telescope physically cannot move the eyepiece far enough to reach focus in the configuration it is set up for.
Many Newtonian reflectors need an extension tube to reach focus with an eyepiece, as shown below.
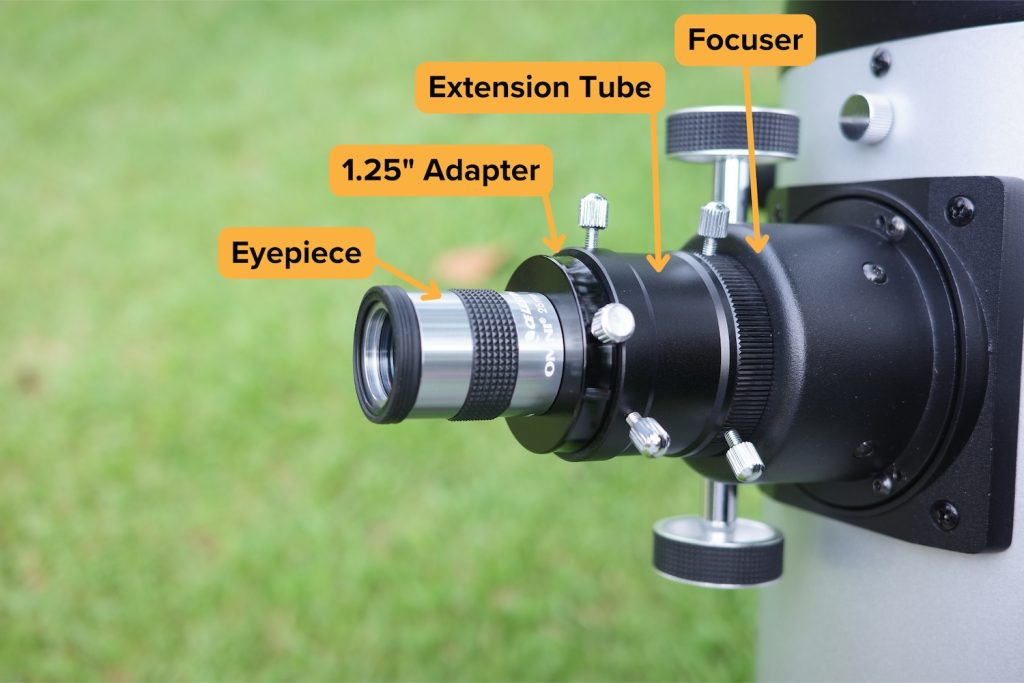
Likewise, many refractors need extension tubes and/or star diagonals.
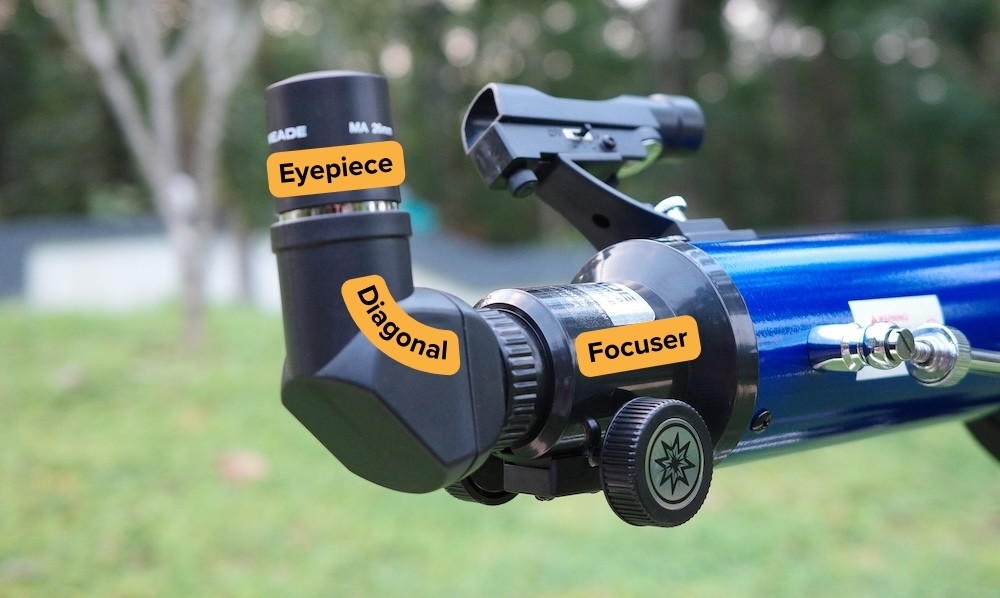
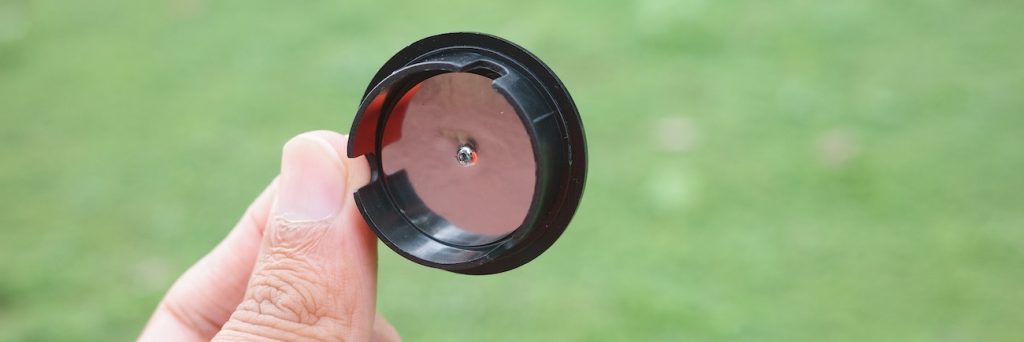
A star diagonal is an angled mirror or prism device that fits between the telescope and the eyepiece, as shown above. It’s mainly used for refractor and Cassegrain type of telescopes to allow one to easily look through the eyepiece when the telescope is aimed high in the sky. If your star diagonal is loose or not correctly seated, it can also lead to focus issues. Make sure it’s firmly in place before attaching your eyepiece.
Without a star diagonal and/or the required extension tubes in place, many refractors and reflectors may physically be unable to reach focus before the focuser drawtube runs out of outward travel. In the case of most catadioptric telescopes, its moving-mirror type of focuser offers near-unlimited travel, but a star diagonal is still used in catadioptrics just to make viewing more comfortable.
Contrarily, if you are attempting to use a frivolous star diagonal or extension tube in a Newtonian or extra extension tubes on a refractor, it may not reach focus due to requiring too much inward travel. This is less frequent, however.
Not all eyepieces or cameras will come to focus at the same point. Most of the time, imaging with a camera and without a Barlow lens requires the removal of any extension tubes or the star diagonal of your telescope, and some telescopes may not reach focus with a DSLR without physically shortening the telescope tube if they are not designed with astrophotography in mind.
Barlow Lenses and Their Effects on Focus
A Barlow lens is a valuable tool in the toolkit of many astronomers. It effectively amplifies the focal length of your telescope, giving a higher magnification with a given eyepiece or increasing the effective telescope focal length for planetary astrophotography purposes. However, while it’s a versatile accessory, it also comes with its quirks, especially when considering its placement in the optical pathway.
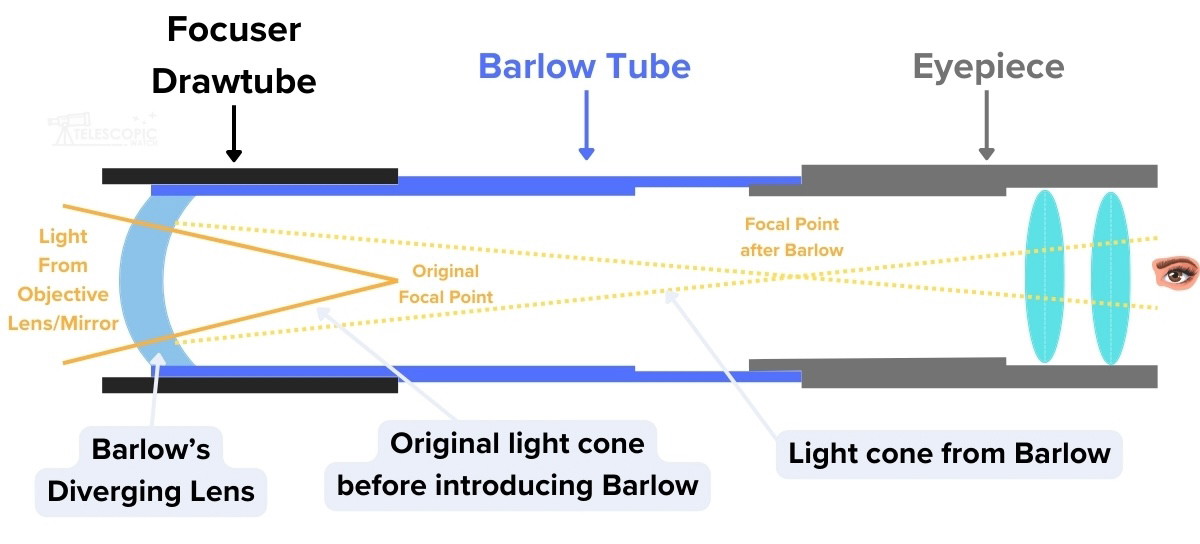
The primary function of the Barlow lens is to increase the effective focal length of the telescope. In doing so, it also shifts the telescope’s focal plane outward, as illustrated above. This shift means that, after inserting a Barlow, you’ll need to adjust your focuser significantly to reach the new focus point. More expensive telecentric “Barlows” such as the Tele-Vue Powermate and Explore Scientific Focal Extenders do not have this problem, however.
Using a Barlow lens before a star diagonal (i.e., Barlow → diagonal → eyepiece) is generally not advisable. Doing so moves the focal plane even further out, often beyond the point where many focusers can reach, rendering it impossible to achieve sharp focus. In most cases, the recommended order is to insert the star diagonal, coma corrector, or any other accessories directly into the telescope first and then place the Barlow lens into the train last, followed immediately by the eyepiece. This order typically provides a more manageable focal plane shift.
An exception to the above rule is if you are using a binoviewer. Many telescopes don’t have enough inward focus travel to reach focus with a conventional binoviewer at all, so many binoviewer enthusiasts have to put a Barlow lens ahead to shift the focal plane outward. This may actually require us to put the Barlow ahead of the star diagonal in order to sufficiently shift the focal plane outward.
3. You may be using too much magnification
Pushing your telescope beyond its magnification limits can result in a blurry image. Remember, more power doesn’t always mean better views.
4. Your scope is just badly designed
I believe that it’s essential to approach manufacturers’ promises with a discerning eye. Many telescopes, despite their marketing claims, have optics that fall short of expectations. Quality control is another critical factor.
Even a well-designed telescope can still fall short if the secondary mirror isn’t perfectly flat or the primary mirror or lens is not polished to the correct curve. I strongly believe that such imperfections are, sadly, often the product of intentional cost-cutting rather than accidental in nature. When they are accidental, they tend to be more subtle in nature.
Some telescope optical configurations, notably the Bird-Jones design, are favored among manufacturers due to their cost-effectiveness in production. However, they put up inherently bad images due to design flaws in their mirrors/lenses. I’ve also noticed that the way they are mounted is often subpar, too.
The mounting of telescope optics is crucial for its performance, but this may or may not be a budgetary constraint or technical oversight.
The accessories of the telescope also play a significant role in its performance. Subpar star diagonals, poor-quality erecting prisms, or inferior Barlow lenses can all introduce distortions. Similarly, eyepieces made predominantly of plastic or those with simple designs (Huygenian/Ramsden, for instance) can have a dramatic impact on the quality of the view.
5. Collimation Issues
One of the primary factors affecting the clarity of our telescope’s view—especially with reflectors and certain catadioptric designs—is collimation.
In simpler terms, collimation refers to the proper alignment of our telescope’s optical elements. Even a slight misalignment of the optics can significantly degrade the sharpness and contrast of the image we observe, making celestial objects appear blurry or distorted. This usually shows up in some form of optical aberrations such as coma and/or chromatic aberration. The tilted nature of incoming light rays due to miscollimation also amplifies any optical flaws in our eyepieces.
Reflecting telescopes, like Newtonians, are particularly sensitive to misalignment. These telescopes employ a primary and secondary mirror, both of which must be precisely aligned to direct light accurately to the eyepiece. Over time, with regular usage or transportation, these mirrors can shift, necessitating periodic collimation, mostly of the primary. This is amplified by the frequent assembly and disassembly if the telescope is of truss or collapsible tube designs.
It’s quite a pain and might sound daunting, especially to beginners. However, I see collimation as a routine process, not a bogeyman. With practice, it becomes straightforward.
More accessible collimation tools for Newtonians, like laser collimators or simple Cheshire eyepieces, can greatly aid in the process. You can easily make one with a film canister, dust cap, or 3D printer in just a few minutes, too!
Collimation on a star is practically a necessity for non-Newtonian telescopes such as Schmidt-Cassegrains, and star collimation can be done for any telescope in a pinch.
For those using refractors or Maksutov-Cassegrains type of telescopes, collimation is less frequently a concern. These telescopes tend to hold their alignment well. However, after rough handling or impact, even these might require a collimation check.
6. Your telescope isn’t thermally optimized
No matter how well-aligned your optics are, it’s no good if the light rays are warped by the optics or air in your telescope. Collimation’s twin and frequently overlooked factor in achieving sharp telescope views is the thermal equilibrium, or cooldown, of both the telescope tube and its optics.
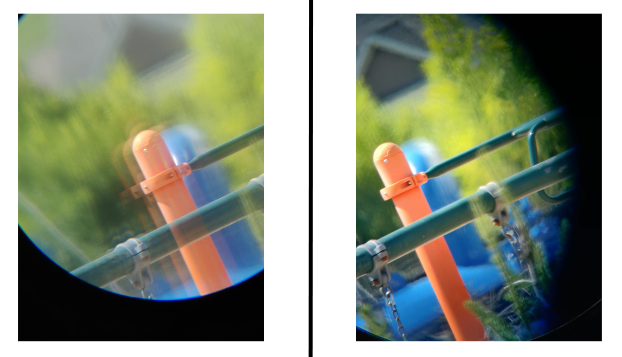
7. Edge-of-field aberrations and chromatic aberration
More on this topic here.
8. Tilted focuser train
A tilt in a telescope’s optical path can introduce its own set of aberrations, often resembling the commonly-seen coma (flared stars) or field curvature (blurry edges) but often including others.
This tilt can happen due to improperly seated eyepieces, diagonals, or other accessories in the optical pathway.
Your focuser itself may also be sagging. Focuser sag is particularly a problem on cheaper telescopes with plastic rack-and-pinion focusers, which inevitably droop and wobble. Adding shims made out of hard plastic or vinyl tape, lubricating the focuser, and tightening the pinion screws usually fixes the problem.
Tilt is a nightmare for astrophotographers. The added weight of heavy cameras, filter wheels, correctors, and other accessories can wreak havoc on the final image. Even a slight deviation from the optimal alignment can lead to issues like image softness, especially noticeable at the corners. A massive, stiff rack-and-pinion focuser is needed for most heavy-duty astrophotography setups.
9. Improperly made or adjusted optics & supports
Modern manufacturing techniques have made telescopes more accessible than ever. However, even today’s scopes are not immune to inherent manufacturing issues that degrade their performance.
It’s essential to note that most lapses in optical quality are and were rarely intentional. To a pretty large extent, manufacturing a subpar mirror or corrector doesn’t save costs to any meaningful degree. In fact, more often than not, these optical problems are genuine mistakes.
Even the Hubble Space Telescope wasn’t immune to early optical issues. Most of the bad telescopes out there are either low-quality designs made to maximize profit and fulfill marketing claims, caused by limitations in available materials, or simply unintentional errors by the builder.
- Pinched optics and tight retaining rings
Overtly tight mirror or lens cell clips or retaining rings can distort and pinch the glass, causing a triangular distortion to the image of stars, for instance. The solution here is to just loosen things up enough. The mirror or lens should be able to spin in its holder but not rock or rattle audibly.
- Proper mirror support
The history of telescope-making has its share of well-intended yet flawed designs.
3 points define a plane, and telescope mirrors must rest on 3 points or a multiple of 3 points that join together into a single triangle somewhere and “float” independently from each other. This is unless the primary mirror is supported at the center and hangs from a post at its middle in some way. The mirror should also be supported from the edge if it is fairly thin and not supported at the center. Failing to follow these rules can distort the mirror.
Larger commercial Newtonians, especially those over 12 inches in aperture, often come under scrutiny in their improperly designed mirror cells. Premium truss Dobsonians might be exceptions, but many others are known for their inadequate edge support, often employing narrow pads instead of the preferable wider ones, rollers, wiffle trees, or slings.
The choice of non-floating support designs in some Newtonian reflectors further complicates matters. Using more than a three-point adhesive system, or simply cork pads, on a non-floating cell often spells trouble (both are fine with floating cells). These construction shortcomings can introduce astigmatism, even in otherwise impeccably made mirrors.
It’s important to keep in mind that improperly designed mirror cells are common in many scopes but don’t affect performance as much as you think. The inadequate edge support of these cells is the main problem and causes astigmatism at the eyepiece. But this is often only visible when aimed low in the sky, where the view may not be sharp due to bad seeing conditions near the horizon anyway.
- Secondary mirror issues
The secondary mirror is equally vital for a reflecting or catadioptric telescope’s performance. Flaws, often resulting from insufficient testing or issues during the polishing process of making hordes of flat mirrors, can compromise the entire optical system. Like with primary mirrors, a hurried polish or a mismatched polishing tool can degrade the quality of the secondary mirror.
Bad secondary mirrors are the biggest killer of present-day commercial Dobsonians’ sharpness. They’re usually not unusable, but at high magnifications, the view suffers. This is very different from the intentional oversight we mentioned earlier.
A not-quite-flat secondary mirror manifests as astigmatism at the eyepiece or oval/cross-shaped stars even at the center of the field. This can be confused with astigmatism inherent in the primary mirror or its supporting mirror cell.
The key to testing your secondary mirror is ruling out your primary mirror by rotating it and aiming at a patch of sky straight up. A badly supported primary won’t have astigmatism when pointed straight up, though if it has inherent astigmatism, it will. Figure out how to rotate the primary mirror in its cell (it doesn’t matter if you have to re-glue it; do it).
For those facing issues with secondary mirrors, replacements are available. Companies like GSO, offered through Agena Astro in the USA, provide quality replacements. Antares Optics goes a step further, offering interferometer testing to different standards, as does Ostahowski Optical.
- Turned-down edge
A turned-down edge is a common occurrence with many refractors and reflectors, where the edge of the optic focuses light at a different point from the rest due to being over polished. This happens when polishing tools get caught on the edge or run too fast during manufacturing. It’s far too common with commercial scopes.
The effect at the eyepiece or in images is fuzzy halos around stars. You can make a paper mask out of cardboard shaped like a ring to stop the telescope and block light from the edge, solving the problem at the cost of some aperture. The alternative is costly repolishing.
Another effect solved by such an aperture mask is spikes on stars originating from the intrusion of mirror or lens cell clips in the way of the aperture. While stopping down the scope leads to less light gathering power, the aesthetic improvement of eliminating these diffraction spikes is quite pleasing in long-exposure astrophotos.
- Rough polishing and zones
Like a turned down edge, at the heart of the issue of rough polishing is the selection of the polishing tool and the speed of the process. An inappropriate tool hardness or an excessively fast polishing speed can result in a surface that doesn’t have the required smoothness.
Instead of the pristine mirror surface needed for precise images, rough polishing can introduce imperfections that scatter light, or “zones” where concentric rings of the mirror focus light at different points!
Larger mirrors, with their broader surfaces, can be particularly prone to astigmatism. While the annealing process is essential to making strain-free glass, the support beneath the mirror provided during grinding and polishing plays a pivotal role. If not done correctly, these larger mirrors can fail to deliver their potential, casting images that lack sharpness and clarity with oval or cross-shaped stars. And remember, bad support can happen in the telescope too, even by the well-intentioned amateur or one-man shop telescope maker.
- Spherical aberration and testing
Achieving the right parabolic shape (or other, for a Cassegrain or catadioptric type) is crucial for an effective telescope mirror. However, errors in judgment during testing or calibration issues with interferometers can lead to suboptimal spherical aberration correction. The outcome is a mirror that doesn’t focus light as effectively as it should.
The Hubble Space Telescope’s primary mirror was a Cassegrain, specifically a Ritchey-Chretien, designed to have a hyperbolic mirror. It was underpolished to the point that an amateur with a flashlight and pocket knife could’ve figured it out by doing a Foucault test. It launched into space like that and cost millions of dollars for astronauts to fix. Oops.
In telescopes like Newtonians, compromised primary and secondary mirrors can have a cascading effect on performance. Similarly, in Cassegrain telescopes, a subpar secondary or corrector plate can magnify existing issues, leading to severely degraded views.
- Complexity of SCTs
Schmidt-Cassegrain Telescopes (SCTs) embody the complexity and precision required in telescope manufacturing. With multiple optical components, each needing meticulous crafting and alignment, the room for error is significant.
It’s no wonder that in the 1980s, during high demand caused by the return of Halley’s Comet, quality control took a back seat to meet production goals. Many SCTs from prominent manufacturers like Celestron, Meade, and Criterion (later known as Bausch & Lomb) had quality issues. While manufacturing has improved, producing an exceptional SCT remains a challenging feat due to the many variables involved.
Many other telescopes from the past are a mixed bag; homemade telescopes range from splendid to abhorrently constructed optically and mechanically. But on the whole, it’s usually easy to test your telescope’s optics or do enough research to figure out if your find was any good.
10. Your Own Eyes Might Be a Culprit
When examining the clarity of a view through a telescope or binoculars, it’s easy to forget a crucial component: our own eyeballs and their optics. Every individual’s eyes are unique, and imperfections, though often minor, can influence what we see.
Usually, the culprit is a temporary issue. Nearsightedness, farsightedness, and most other problems your eyeglasses or contacts correct for are rendered irrelevant by your telescope’s optics too. The exception is astigmatism, which we’ll get to.
- Dry Eyes
Perhaps the most common issue affecting your eyes when stargazing is dehydration. Slight dehydration, often exacerbated by caffeine, can cause your eyes to have trouble focusing at the eyepiece. This is exacerbated if any cold wind or particulate matter blows into your eye to irritate and dry it further. The medical condition of chronic dry eye, of course, exacerbates this problem.
- Floaters
Floaters are small specks or threads made of clumps of collagen fibers that float in the vitreous humor of the eye. They cast shadows on the retina and, as a result, appear as moving spots in your field of vision. While they’re generally most noticeable when you’re looking at a uniform background, such as the blue daytime sky or a white wall, their visibility can significantly increase when using telescopes or binoculars.
Especially at higher magnifications with small exit pupils, the contrast between the dark background of space and the illuminated floater can make them seem more prominent. An exit pupil is the diameter of the light beam coming out of the eyepiece, and when it’s small (which is common at high magnifications and with smaller telescopes), floaters can appear larger and more obstructive.
However, as you move your eye or try to ‘look’ directly at a floater, it tends to drift out of view, given its nature of floating in the eye’s vitreous.
Wider fields of view, backing off the magnification, or switching to a bigger scope are the only ways to do much about floaters, unfortunately.
- Caffeine, Alcohol, & Drugs
Caffeine and alcohol cause your pupils to restrict instead of dilating at night. This causes your naked-eye view to dim and makes lower powers less usable through a telescope. In small doses, neither of these substances will really make much of a difference, however.
Additionally, caffeine, too much sugar, etc. can cause slight hand tremors, which can be problematic if you are trying to aim anything by hand.
Various medications can affect vision, either by causing dryness, altering the shape of the cornea temporarily, or affecting the size of the pupil.
For example, the pupil dilation drops used by ophthalmologists increase the pupil’s size to allow a better view of the retina. However, while one might think this would be beneficial for stargazing, the uneven dilation can lead to aberrations and not necessarily provide a better view of the night sky.
Some prescription medications may limit your pupil dilation similarly to large amounts of caffeine or alcohol, in addition to causing other issues with using a telescope.
- Astigmatism
A significant culprit of bad views caused by the shape of your eye itself is astigmatism, a condition where the cornea’s curvature is uneven. This irregularity can cause light to focus on multiple points inside the eye, leading to a blurry or distorted view.
In the context of stargazing, individuals with severe astigmatism may find that stars look elongated or smeared rather than pinpoint-sharp. While mild astigmatism might be compensated for by the telescope’s eyepiece, those with pronounced astigmatism might benefit from using contacts.
Astigmatism-correcting eyepiece attachments, as well as those eyepieces designed with enough eye relief to wear eyeglasses, generally compromise on either the field of view or overall quality or are much more expensive than eyepieces devoid of this constraint.