
You have your new telescope—your first. You followed the assembly guide, and now you want to get the most you can out of your investment. This first-time telescope user’s guide is exactly what you are looking for and will also act as a doorway to other articles of ours.
- Parts of a Telescope and Its Functions
- Aligning the Finder Scope With Optical Tube
- Understanding Eyepieces, Barlow Lenses, and Magnification
- How & Where to Move The Telescope to Find Objects?
- The Best First Target: Moon
- Next Best Targets: Planets
- Next Targets: Deep Sky Objects
- From Where to Observe: The Light Pollution Factor
- Taking Pictures & Astrophotography
- Daytime vs. Nighttime Use
- Caring for Your Telescope
- Upgrades and Accessories
- Join an Astronomy Club
- A Few More Tips
Parts of a Telescope and Its Functions
You will learn what they mean so that you can use your telescope meaningfully to have an awesome celestial observing experience.
Aligning the Finder Scope With Optical Tube
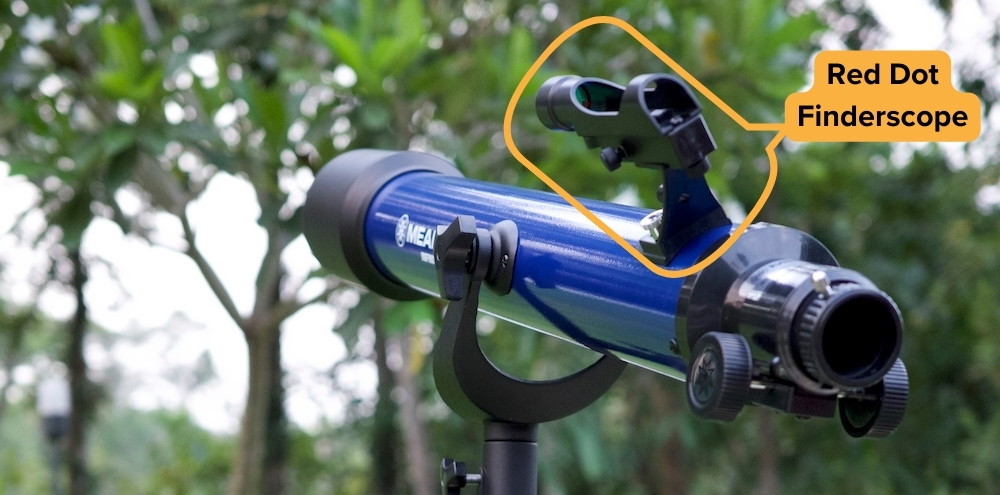
Once you have your telescope assembled, the next most important thing to do is align the finder, be it a red-dot finder or a magnifying finder scope. This is done to make sure that the finder and the telescope are looking at the same thing. This is to be done during the daytime.
Here is the detailed article on how to align your finderscope with your telescope
Understanding Eyepieces, Barlow Lenses, and Magnification
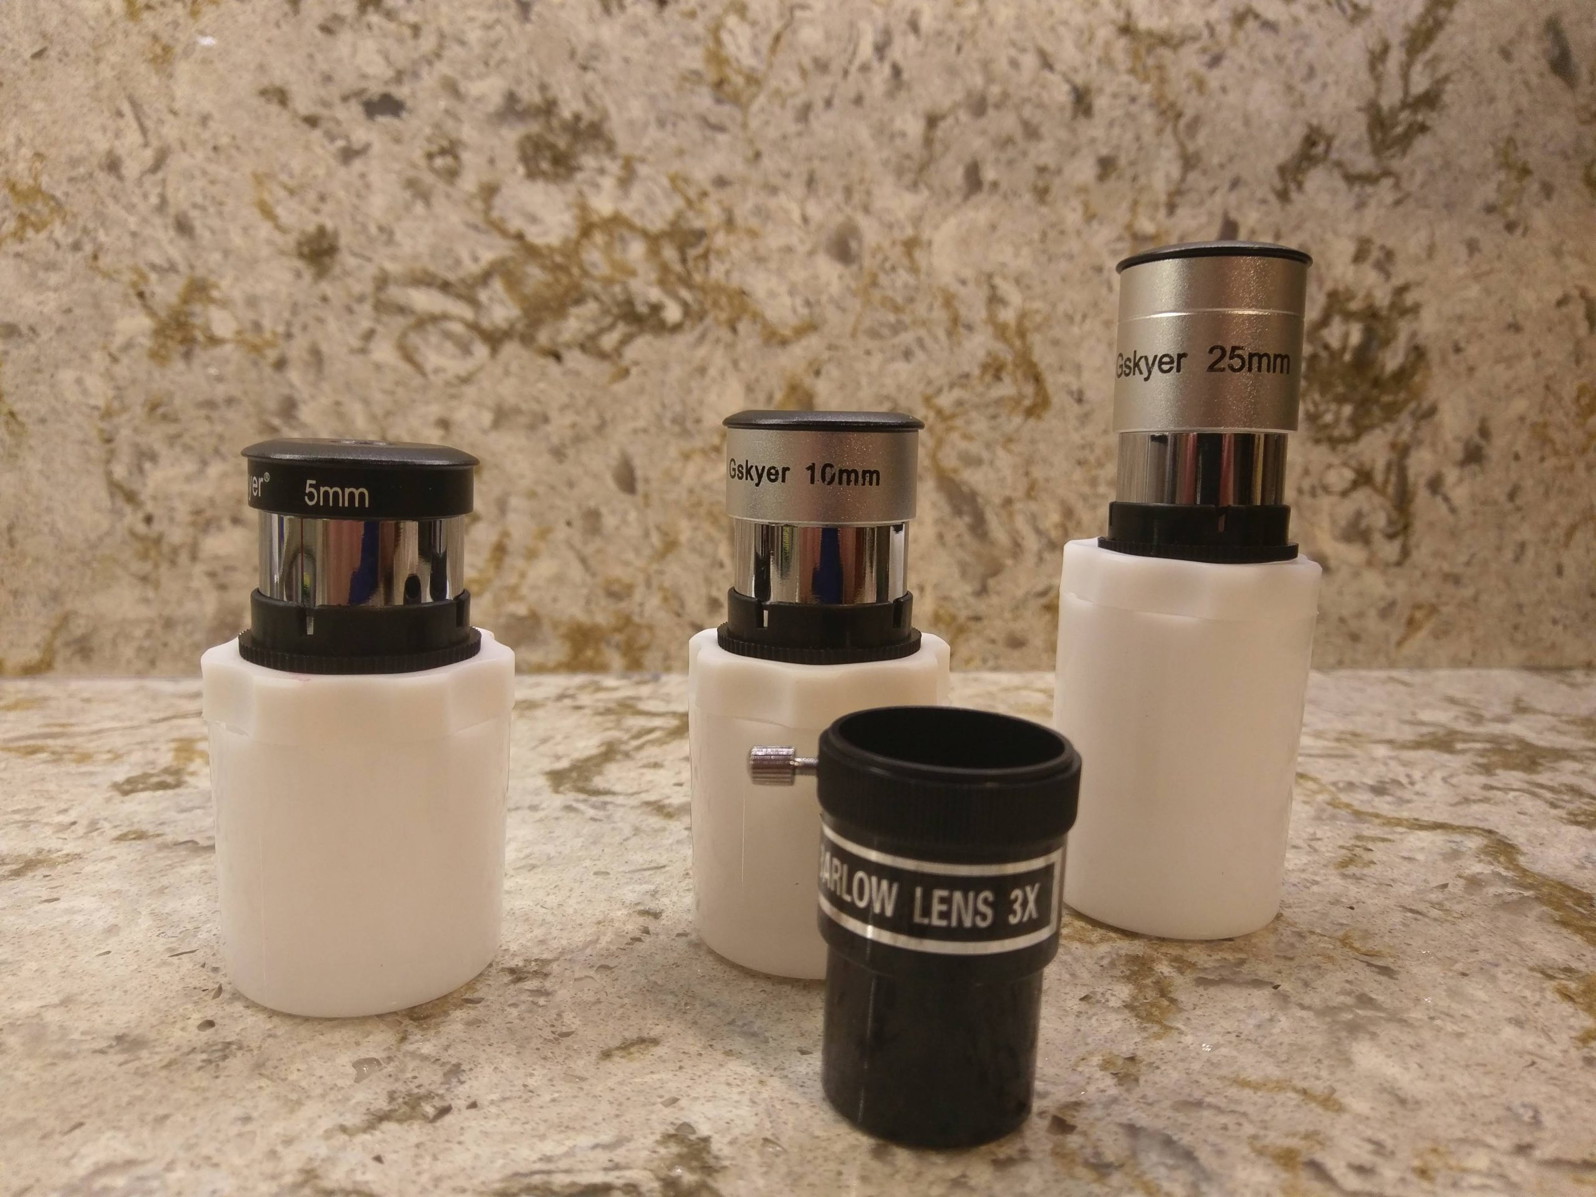
An eyepiece takes the image and magnifies it. The reason you typically have more than one is that some objects look better at low magnification and some look better at high magnification.
Two eyepieces are enough to get you started. This will give you high-power and low-power choices, so you can try each based on what you are observing. Over time, you will get to know what looks best at high power and what looks best at low power.
You can also add more eyepieces of different focal lengths, or you can add a Barlow lens which gives each eyepiece more than one magnification.
Let’s see how this works in a real-life situation.
Remember focal length telescope / focal length eyepiece = magnification or power
Let’s say you are looking at the Moon. You have a 114-mm-aperture optical tube with a 1000-mm focal length. It came with a 25 mm and a 10 mm eyepiece. This is a common starter eyepiece set. The 25 mm will give you 40X or 40 power. (1000/25 = 40) The 10 mm will give you 100X.
The Moon looks great at 40X, and 100X allows you to get closer to examine the surface in more detail. But what if you wanted to try to get even closer? You could buy a 6 mm eyepiece, which would give you 167X.
Or you could get a 2X Barlow. If you put the 25 mm eyepiece in the 2X Barlow, it would work like a 12.5 mm eyepiece for the 80X. With the 10 mm, it would work like a 5 mm eyepiece for 200X. With one Barlow, you now have four magnifications.
Unfortunately, we can’t just keep increasing the magnification.
Maximum Practical Magnification
If you have ever used a two-finger zoom to look at a photo on your phone or tablet, you have seen that if you zoom too much, the image starts to look bad. The same happens with telescopes. If we apply too much magnification, the image starts to degrade. It may get bigger, but we don’t see any more detail. In fact, we might see less detail.
A good estimate of what the highest practical magnification is for a given telescope is 2 times the aperture in millimeters. So this 114-mm telescope we are using in the example would have a 228X maximum practical magnification on a very clear night with a calm atmosphere.
However, not all objects will look good at 228X, so having a selection of magnifications allows us to optimize the image to see the most detail, and that best image is often at less than the maximum practical magnification.
Regardless of how costly and great-quality your telescope is, you will often be limited to less than 300x, even on clear nights. There is no law that says you can’t try to go higher, but real limiter to how much magnification we can apply is the distortion introduced by the atmosphere. Air pollution, humidity, or dust in the atmosphere are also limiting factors.
Read the standalone article about the maximum practical magnification limit of a telescope
Deciding Which Eyepiece & Magnification To Use
There are no hard-and-fast rules as to what magnification you should use for any given object. However, planets, double stars, and globular clusters are typically higher-power targets. They are usually best viewed at greater than 100x.
Many nebulae, large open star clusters and galaxies often look best at less than 100X.
You will have to experiment to see what looks best in your telescope from your location based on the current atmospheric conditions. But now that you understand how eyepieces work, you can explore what you have and make plans to expand your eyepiece collection.
How & Where to Move The Telescope to Find Objects?
Here we address two challenges: telescope instructions on how to know what to look for and how to find it.
Turn Left at Orion (TLAO) is one of the most popular astronomy books ever published. The key reason I recommend Turn Left at Orion is that it provides excellent diagrams of what things will look like in your telescope. So many books include beautiful Hubble Space Telescope photos, but that is not what you are going to see with your telescope. TLAO shows you what to look for and how to find it.
Turn Left at Orion will teach you how to star-hop, which is a very popular way to find things. This is very much like planning a family car trip using paper maps. When star hopping, you typically:
- Start at this bright star
- Go X degrees to the right till you find this little arc of stars
- Then go Y degrees down till you see this triangle of stars
- Now go Z degrees to the right and you should see your target
Once you master star hopping, you can find anything that is within the optical capability of your telescope.
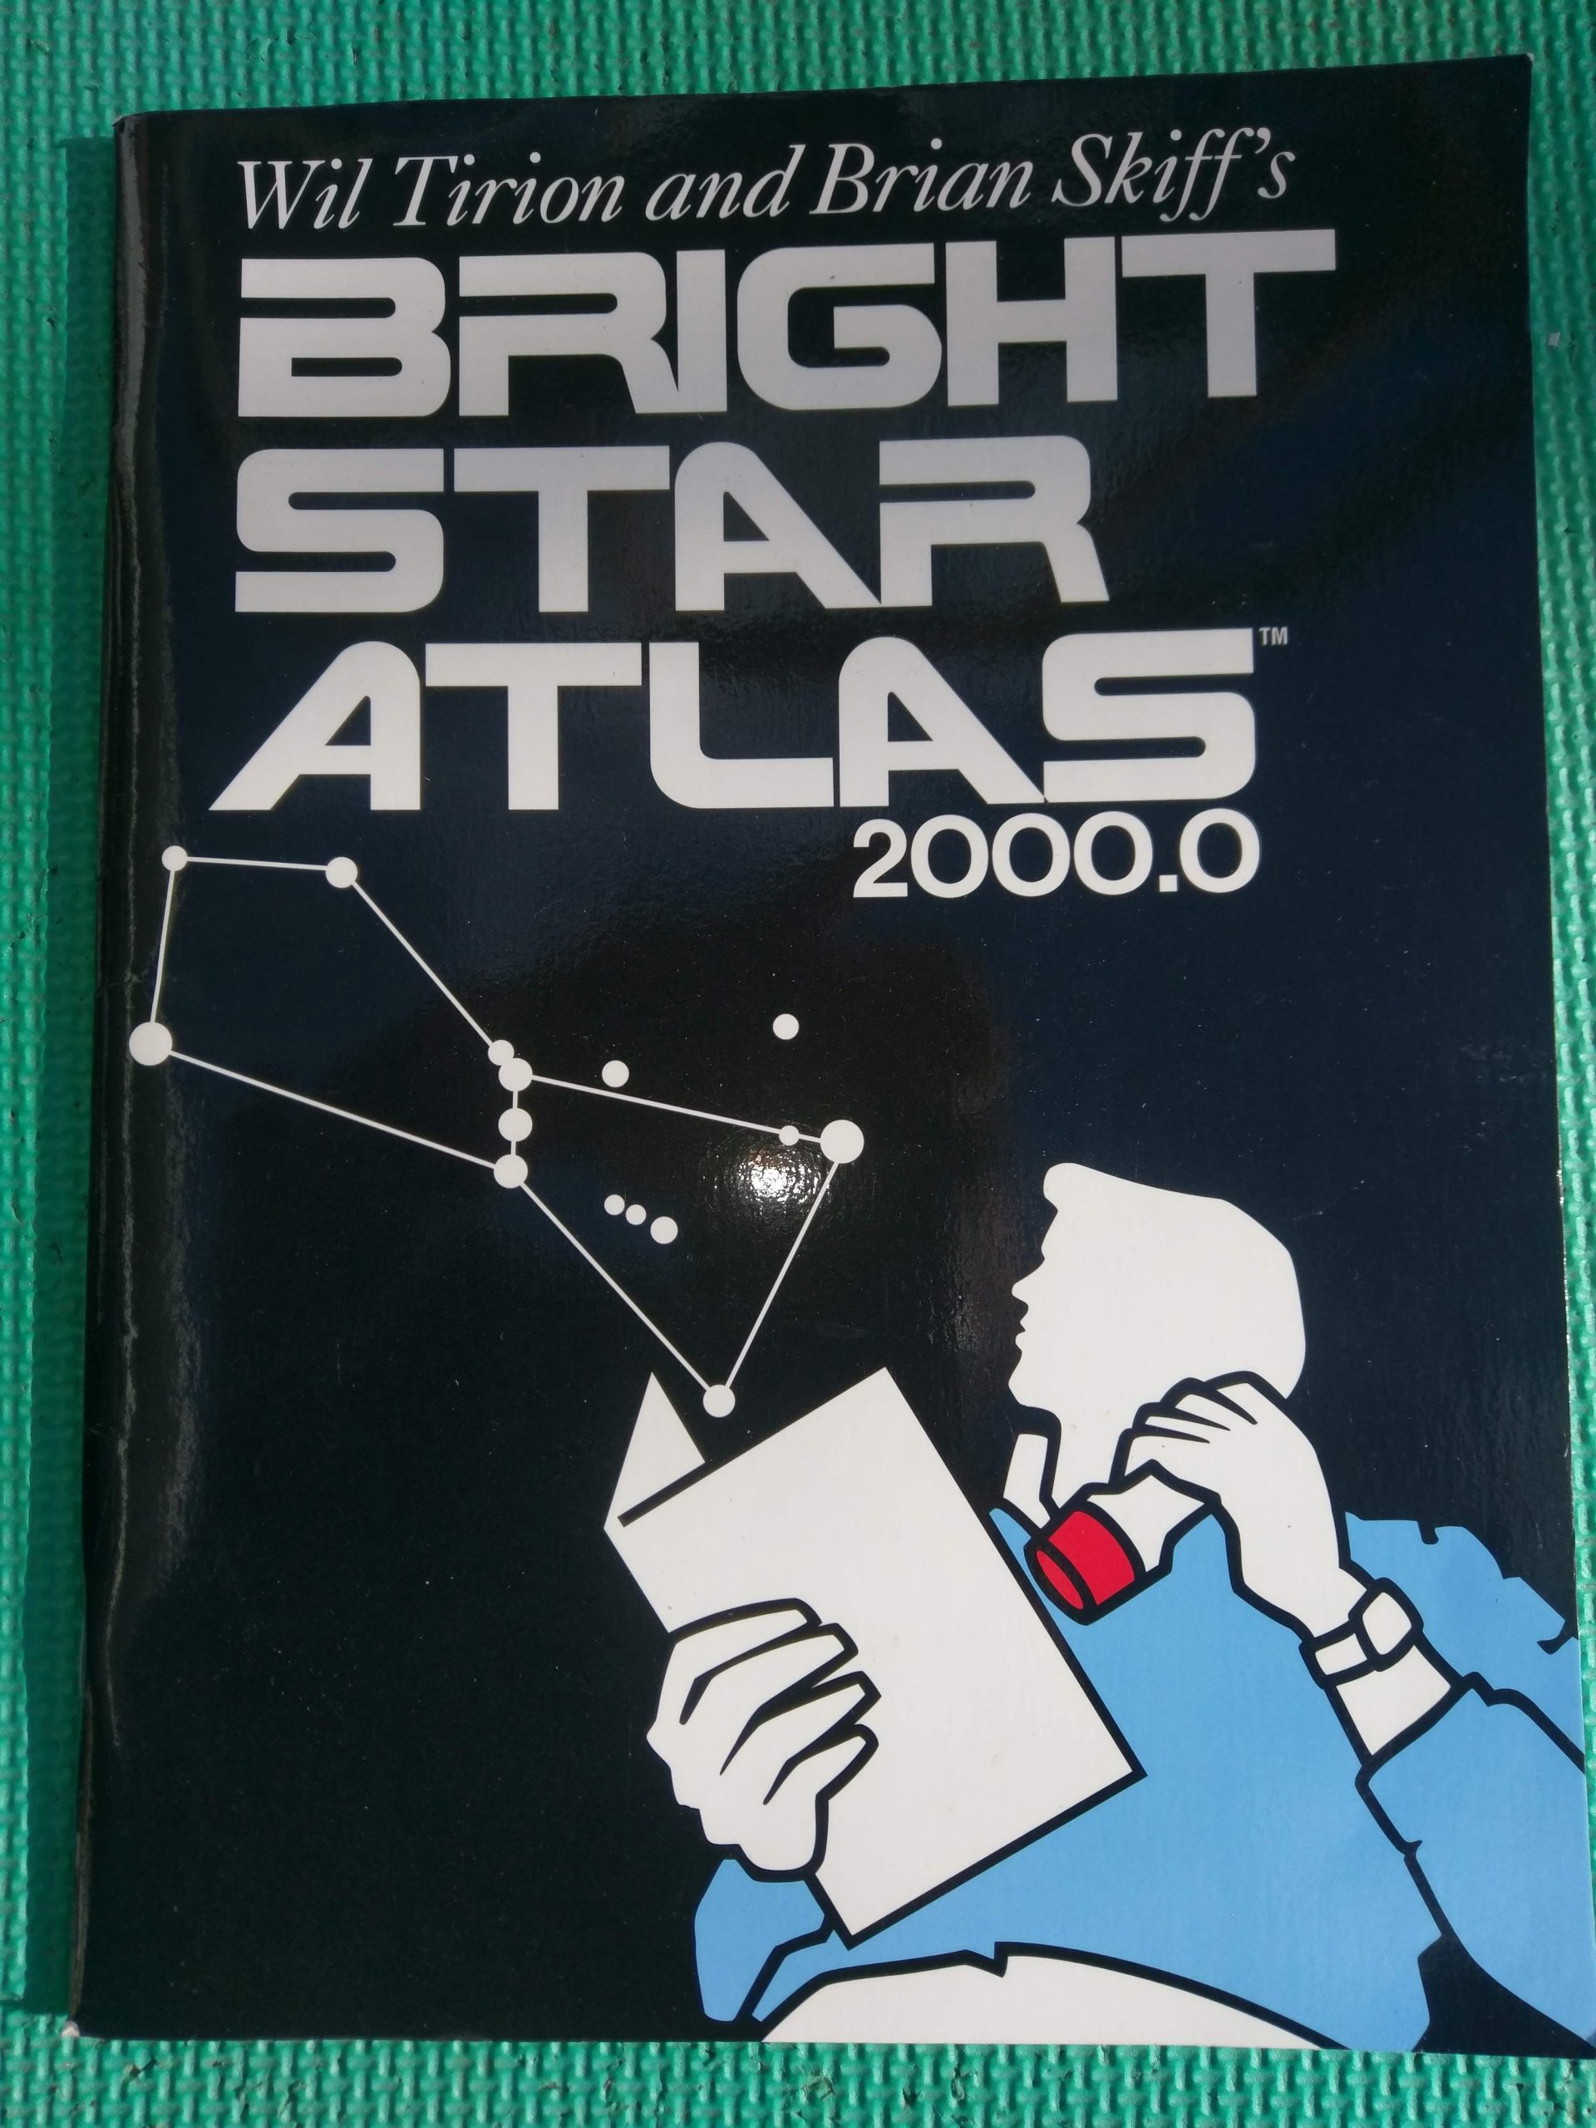
In addition to Turn Left at Orion, you will likely want a star chart. One of the less expensive ones that focuses on the brighter objects in the sky is “Bright Star Atlas 2000”. I think it makes a great first star chart. Great instructions, and more than enough to get you started.
A good source of observing lists is the Astronomical League. They publish lists of all sorts to give you an organized program to follow. And they provide awards for completing the programs.
Resource examples would be:
- Monthly sky charts with suggested targets
- The Messier List
- Binocular targets (also great for small scopes)
- Double Stars
- Galaxies
- Many others
If you are using an AltAz mount, you can use a phone or computer planetarium app that presents a map of the sky and the real-time altitude and azimuth coordinates of your target.
If you search in your app store for astronomy apps, you will find such titles as Stellarium, SkEye, SkySafari, and others. I like to use Stellarium on my home computer and my phone. It can be downloaded for free on your desktop Windows computer. It is also available for your phone or tablet for a small fee.
Using one of the planetarium apps, I can get the real-time altitude and azimuth coordinates for my target when using AltAz mount.
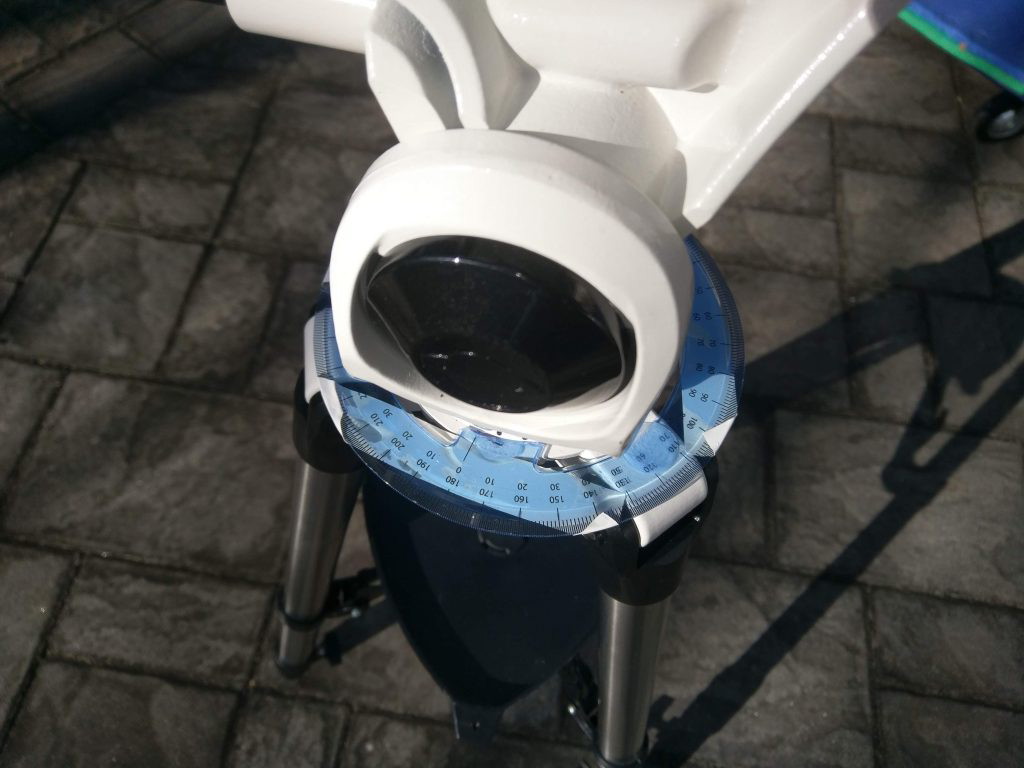
I point the zero of this scale to the north with the help of a compass. Then I can turn to the appropriate azimuth degree required. Before I added this, I used a compass, but this works better.
For altitude coordinate, I use a carpenter’s digital angle gauge to set the angle of the scope.
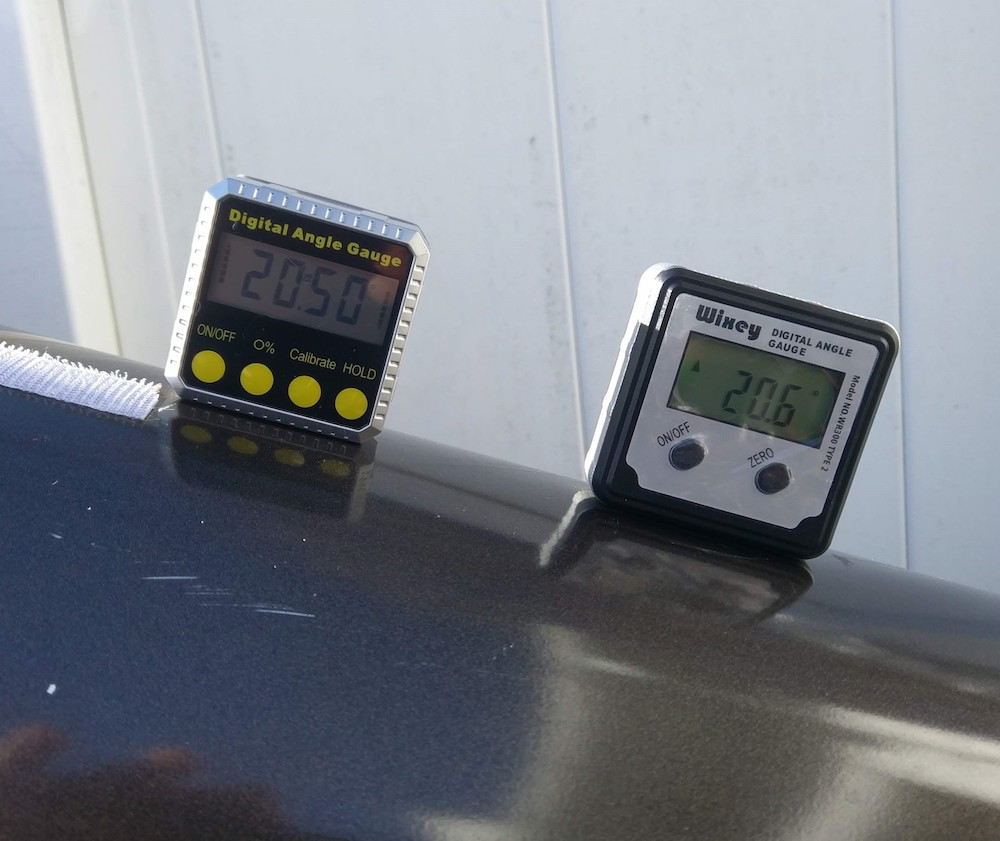
For example, let’s say I wanted to find the Owl Cluster, NGC457, which is a beautiful open cluster in the constellation Cassiopeia. I could use the search feature in the app to find it. As an example, it would tell me that the Owl Cluster is at 42 degrees azimuth (approximately northeast) and 35 degrees altitude (height above the horizon).
I would turn my scope to 42 degrees using a compass or a 360 degree wheel on the mount of the scope. Then I would use the angle gauge to find 35 degrees of altitude. That will put me very close to the location. I would use my low-power eyepiece to look around, and, bingo, there it is.
If you are using an equatorial mount, one of these apps will help you find the right ascension and declination coordinates, which are represented by dials on the equatorial mount. Once you have the mount polar aligned, you can turn the scope until the dials match the coordinates.
If you are using a GoTo mount, first align the mount according to the instructions for your mount. Then you input the name of the object you want to see. Most things have a variety of names. For example, the Pleiades open star cluster is also called M45. Or they have a New General Catalogue (NGC) number. You can get these numbers from paper charts or the apps I mentioned above.
Once you put this into your GoTo handset, the telescope will swing to that target. Once you confirm that it is in the field of view of your low-power eyepiece, you confirm it on the handset. The GoTo mount will track it for you. This is almost like having a self-driving car.
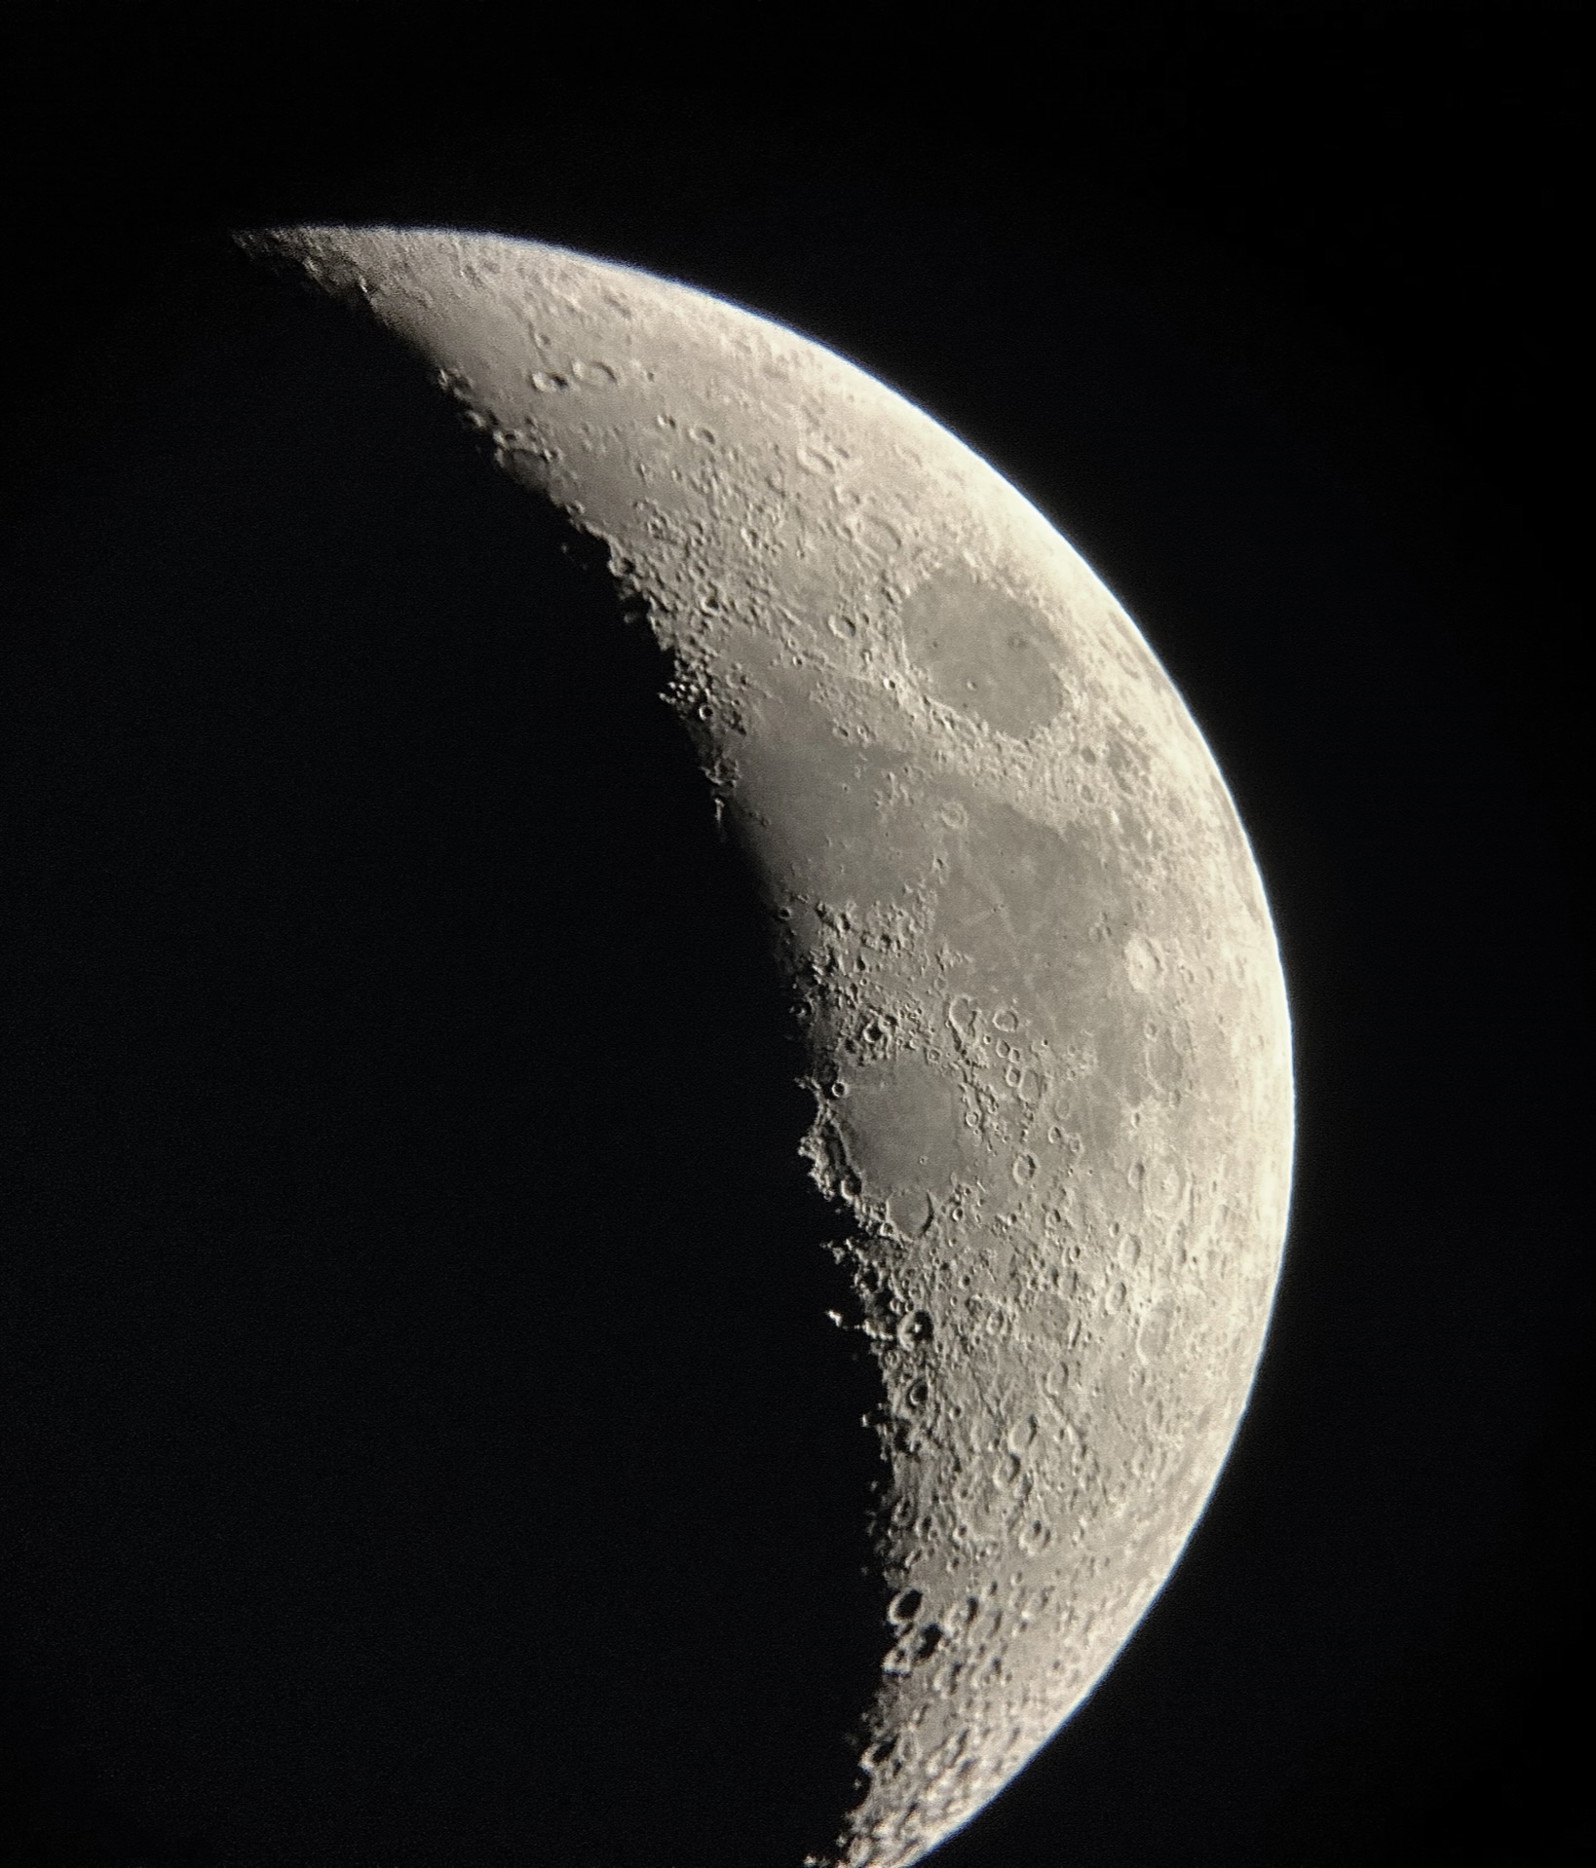
The Best First Target: Moon
The Moon is usually the best first target. It is large, bright, and easy to find. We can view it at low power, which shows the moon in the context of the surrounding star field. Or we can use high power to probe into craters and mountains.
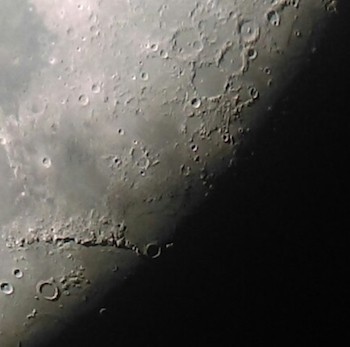
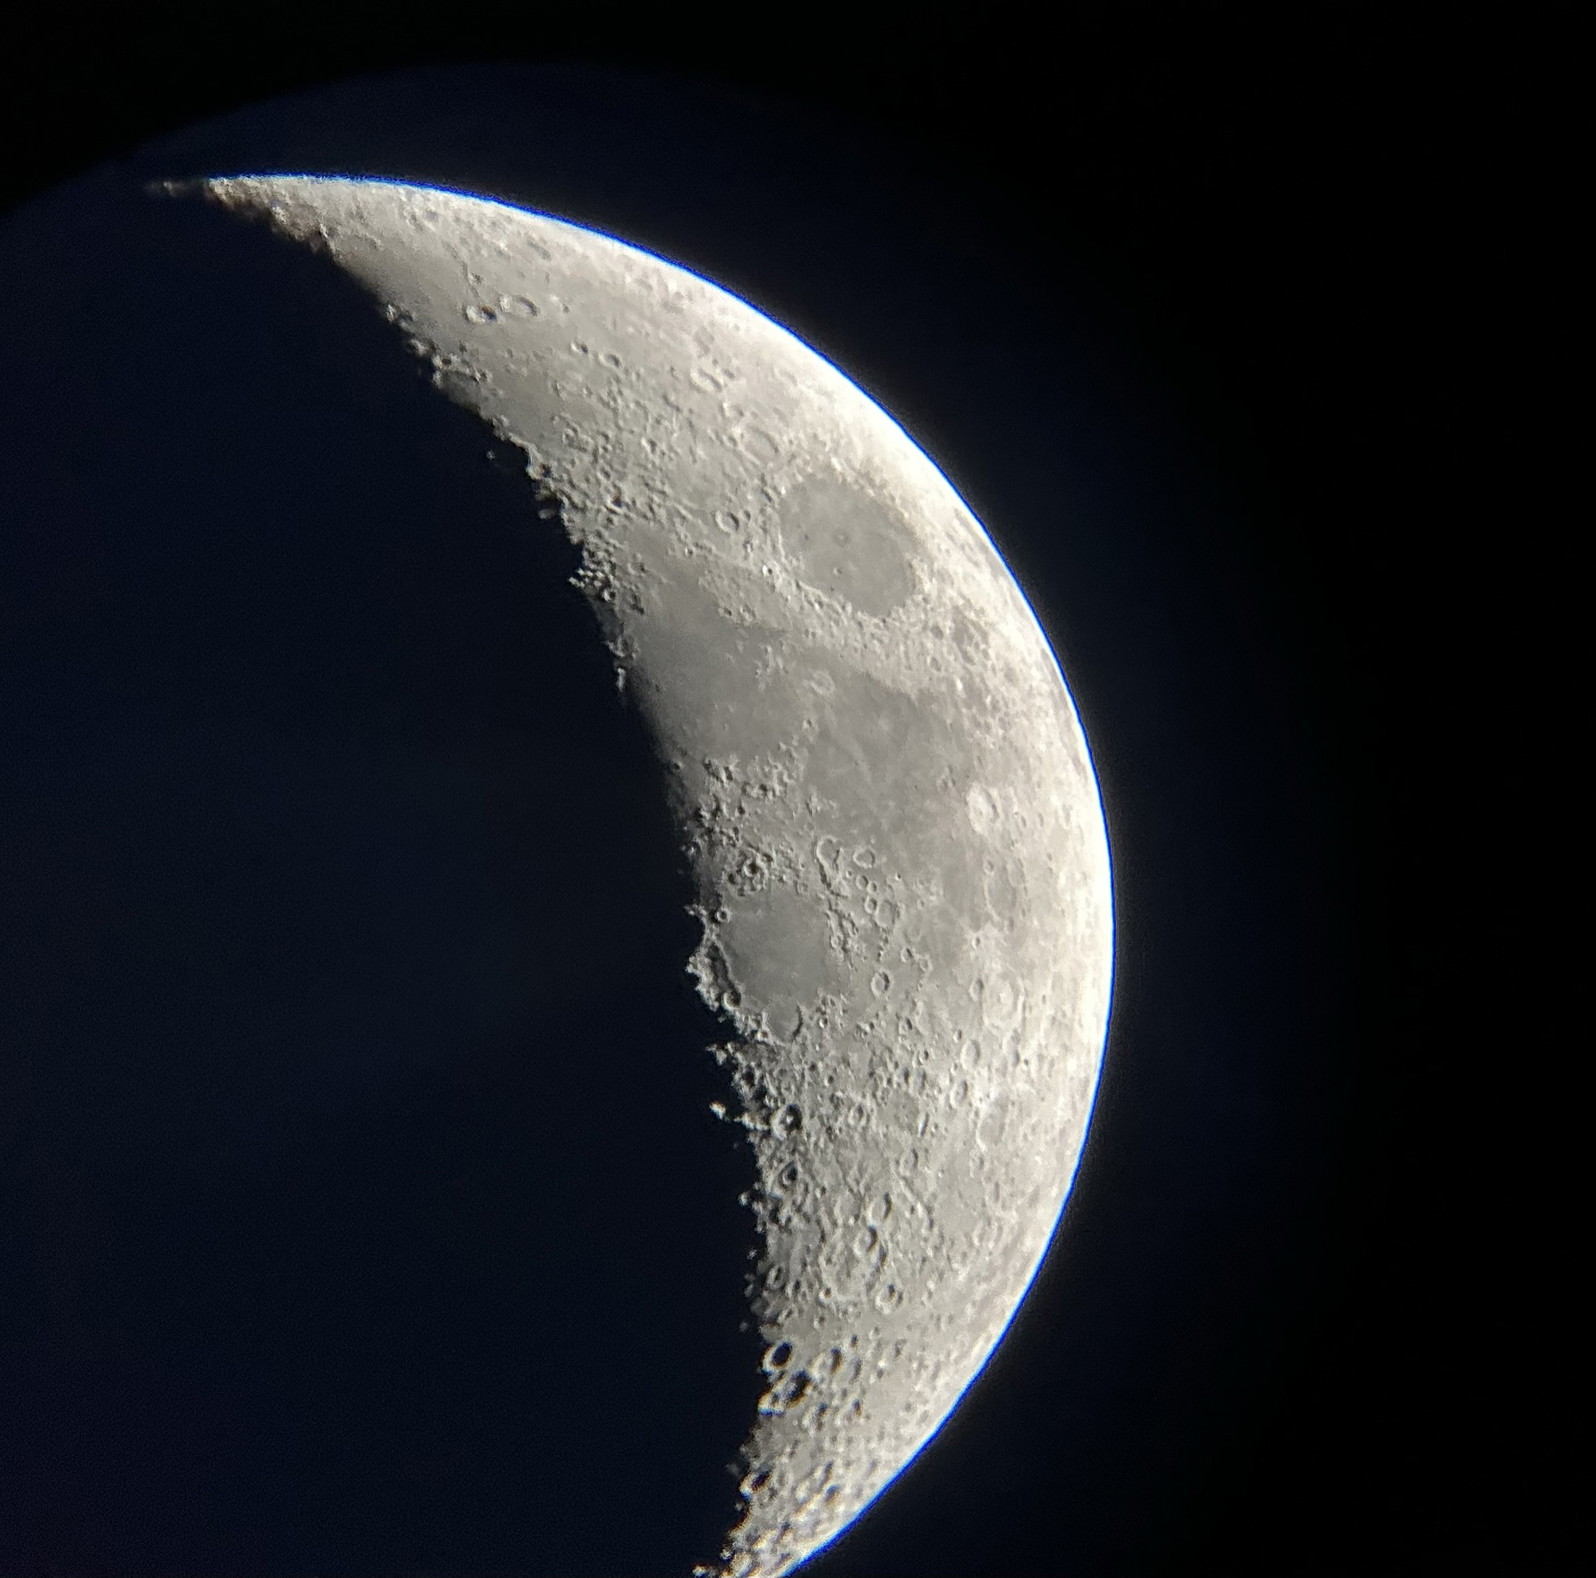
The best time to view the Moon is when it is less than fully illuminated. This creates shadows, which give the lunar surface greater depth and texture. When the Moon is fully illuminated, the full Moon, everything is brightly lit with very few shadows. It almost looks flat. So a monthly plan to view the moon on every clear night is a great idea and a great way to get to know your telescope. As that dark/light line, called the terminator, travels across the surface, it can reveal some very interesting things.
I usually recommend the Orion Moon 260 map to beginners. It does a wonderful job of showing the Moon and points out 260 key features, including the Apollo landing sites.
Read detailed article on viewing Moon with a telescope
Next Best Targets: Planets
The inner planets are usually the next thing that people want to view. However, these are not always in the sky. The planets move around the Sun at a different pace than the Earth, so they can be nearer to the Earth at times and farther away at other times. Sometimes they are on the other side of the sun, so they will not be in our night sky.
When they are in the sky, they will always travel in the southern sky along an arc that is called the ecliptic. This is the same arc that the Sun and Moon travel. Once you know where to look, they are easy to spot when they are in the sky.
Jupiter and Saturn are wonderful to view. Even with a 70-mm telescope, you can see cloud bands on Jupiter and the great red spot. You can also see the 4 bright moons of Jupiter.
Read detailed article on viewing Jupiter with a telescope
Saturn is the rock star of the planets. The rings are spectacular, even with a small telescope. With a larger telescope, you can see some of Saturn’s moons, which look like stars. Of course, the more aperture you have, the more you can magnify the planet and the more detail you can see.
Read detailed article on viewing Saturn with a telescope
Venus is the third-brightest object in the sky, after the Sun and the Moon. However, it is covered in clouds, so you can’t see any details of the planet. Venus goes through phases, like our Moon, and these can be observed. Because it is closer to the Sun that the Earth, Venus is usually best observed near sunset or sunrise. I like to use my moon filter when viewing Venus.
Read detailed article on viewing Venus with a telescope
Mars comes close to Earth every two years. This is why Mars missions occur on a two-year cycle. When it is close, it is possible to see shadings on the surface and the polar ice caps. One of the challenges with Mars is that it is often subject to dust storms, and some will envelop the entire planet, obscuring our view of the surface.
Read detailed article on viewing Mars with a telescope
Mercury is very close to the Sun and can only be seen very close to sunrise or sunset, often just before the Sun has fully set. It will appear as a bright star. Under high magnification, you can see that it is actually a disk rather than a star, but you are unlikely to see any other detail. Because Mercury is so close to the Sun, you must be VERY careful. If you were to accidentally get the Sun, even the setting Sun, into view, you could damage your eyes. So be very careful if you are going after Mercury.
Read detailed article on viewing Mercury with a telescope
Neptune and Uranus can also be seen, but they are very distant and, therefore, much harder to pick out. In a small telescope, say less than 100 mm in aperture, these are going to look like stars. Even in a larger telescope under higher magnification, they are small blue or blue-green dots in the sky, but they can be fun to find.
Read detailed article on viewing Neptune with a telescope
Read detailed article on viewing Uranus with a telescope
Within the solar system, you can also occasionally see comets and asteroids that come close to Earth. But these are very elusive because they are small and they are in a different location each night.
You can view the Sun with any telescope, but you MUST have a solar filter on the scope that covers the entire opening on the front of the scope. Never use a solar filter that attaches to the eyepiece. Pointing your telescope at the sun without the proper filter will damage your eye and can lead to blindness.
Read detailed article on viewing Sun with a telescope
You don’t need a large scope to view the Sun. Even 40- to 60-mm telescopes can be used for the Sun and the bigger scopes work well too.
To the surprise of many, it is possible to view the Moon, Jupiter, Venus, Mars and sometimes Saturn during the day. Just make sure you are well away from the Sun.
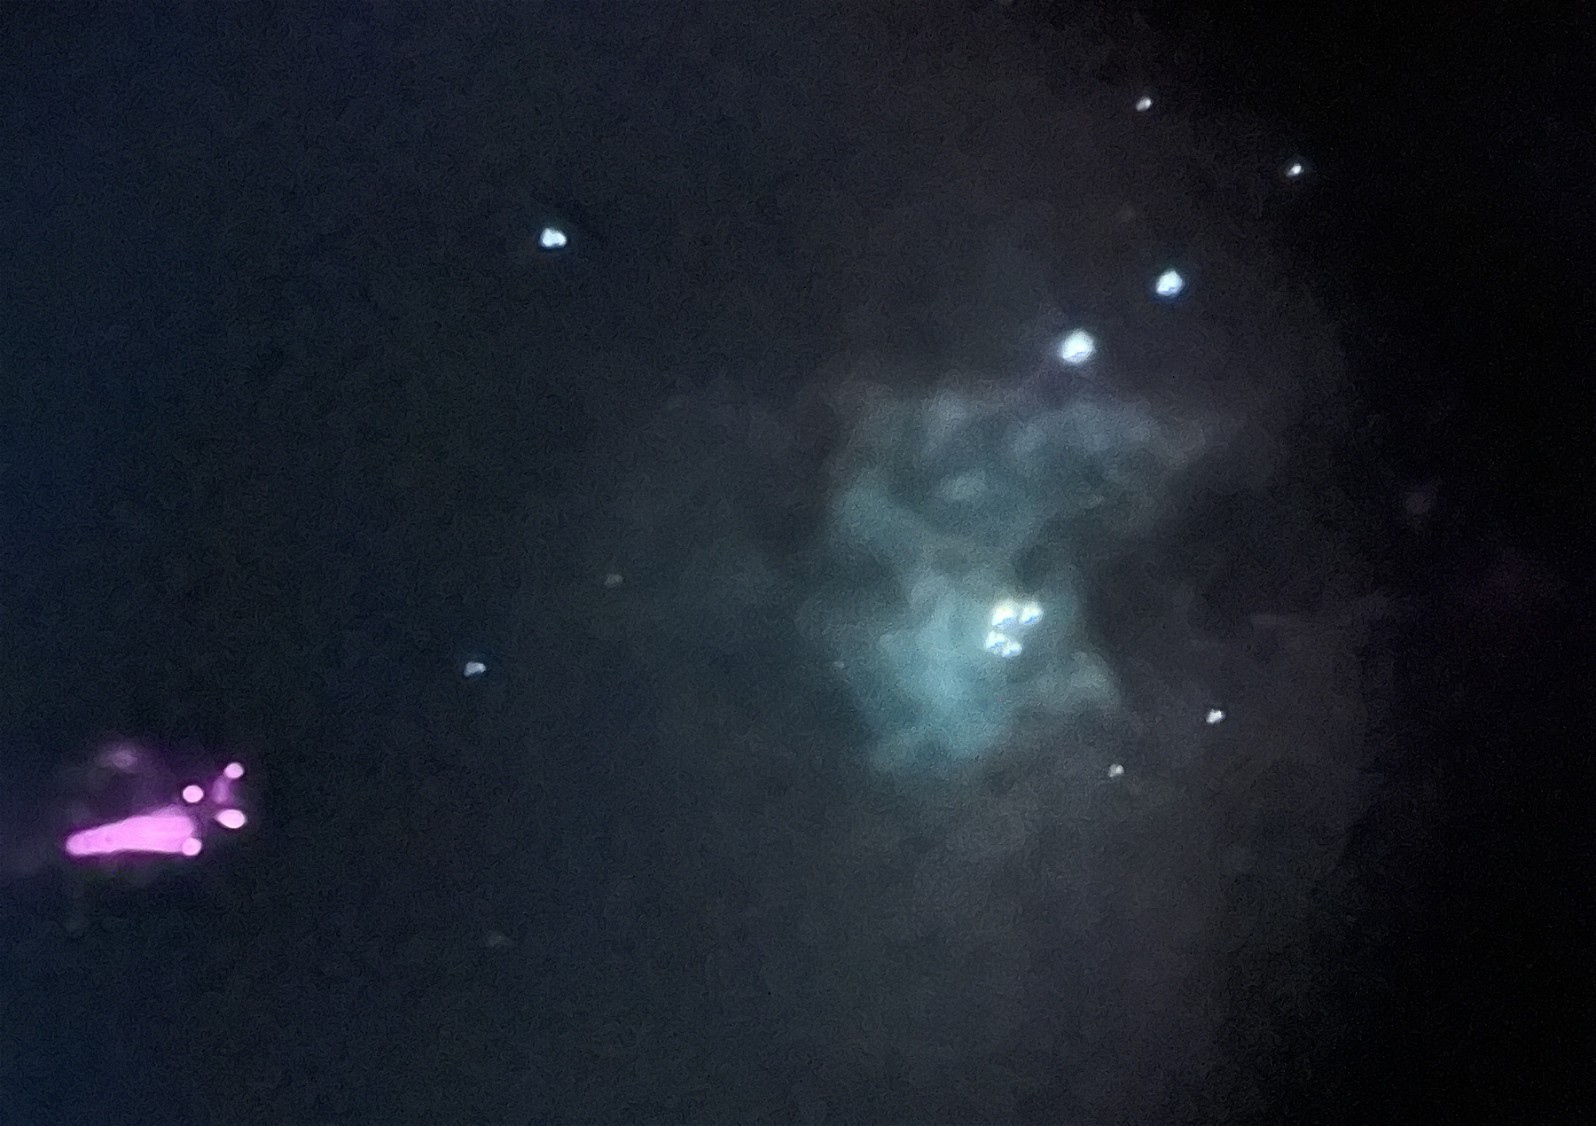
Next Targets: Deep Sky Objects
After the Moon and the planets, we move on to the deep-sky objects. These are outside our solar system, deeper in our galaxy, the Milky Way. Some are outside our galaxy.
Deep sky objects, DSOs, include open clusters, globular clusters, galaxies, nebulae, and double stars. The larger the aperture of your scope and the darker the sky, the better these will look in your telescope. There are thousands of DSOs to enjoy.
10 Easiest Deep Sky Objects to Watch With Telescope & Their Sketches
From Where to Observe: The Light Pollution Factor
This is not about the telescope but about where it is being used. Your telescope, used at a dark site, will show you a lot more objects and a lot more detail than if it were used at a light-polluted site. It is also easier to star hop at a darker site because you can see more stars.
For example, the Andromeda galaxy, when viewed from a light-polluted location, may look like a grayish smudge against that light-polluted sky. Hop in the car and drive 30 minutes to a dark location, and the Andromeda galaxy will look very different. You may be able to see the dust lanes, a bright core, and the overall shape. Same scope, different location.
So, if you are in a city or brightly lit suburb, take ease of car travel with the scope into consideration. This is not vacation travel, but a quick trip to a darker location. Although planning a vacation to a dark site can make for a great family experience.
If your home location is very bright, then you may wish to focus on these targets at home:
- The Moon
- Planets
- Double stars
- Bright open star clusters
- Bright nebula
Also, note that the Moon itself is a huge source of light pollution. Look up during a full moon and consider the number of stars you see. Do the same when it is a new Moon and the sky is dark. You will see a lot more stars when the Moon is not in the sky.
When you take a trip to a darker location, shift your attention to the targets that are more sensitive to light pollution:
- Galaxies
- Nebula
- Globular clusters
This way, you spend your time successfully observing what you can see from your location and less time being frustrated over what you can’t see or how dim or fuzzy they are.
Read Zane’s detailed article on light pollution and its effect on astronomy
Taking Pictures & Astrophotography
There is picture-taking and then there is astrophotography. In the language of telescopes, they are not the same thing.
You can take a picture through the eyepiece of any telescope with your smartphone or a compact camera. You can even buy a special frame adapter that will hold the phone for you. This is not considered astrophotography.
Astrophotography (AP): Let’s just say that this is expensive.
Astrophotography involves long exposures, digital cameras, computers, and more. AP is all about the mount, not the optical tube. You could spend $1000 just on the mount for AP. If you ask about scopes and mention AP, you will get a very different answer than if you say you want to take some pictures through your telescope with your smartphone.
Daytime vs. Nighttime Use
Refractors work well as daytime spotting scopes. In fact, most spotting scopes are nothing more than refractor telescopes that have been optimized for daytime use.
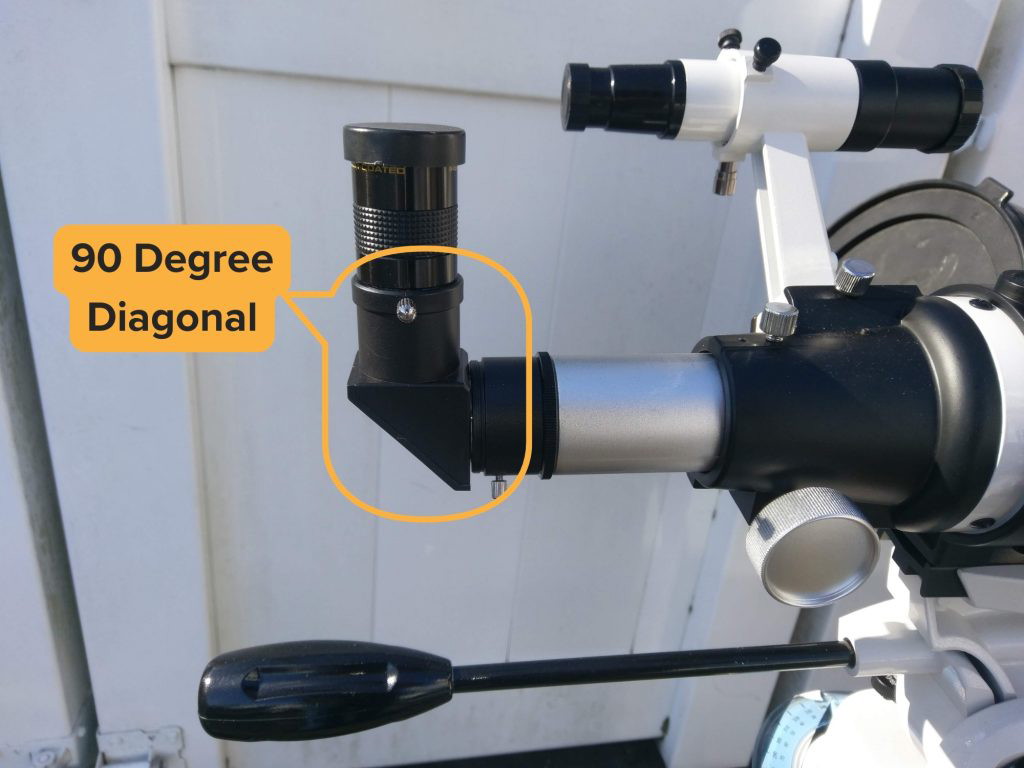
While a 90-degree diagonal is best for astronomy, many prefer an eyepiece angle of 45 degrees for daytime use. This is very popular on commercially available spotting scopes.
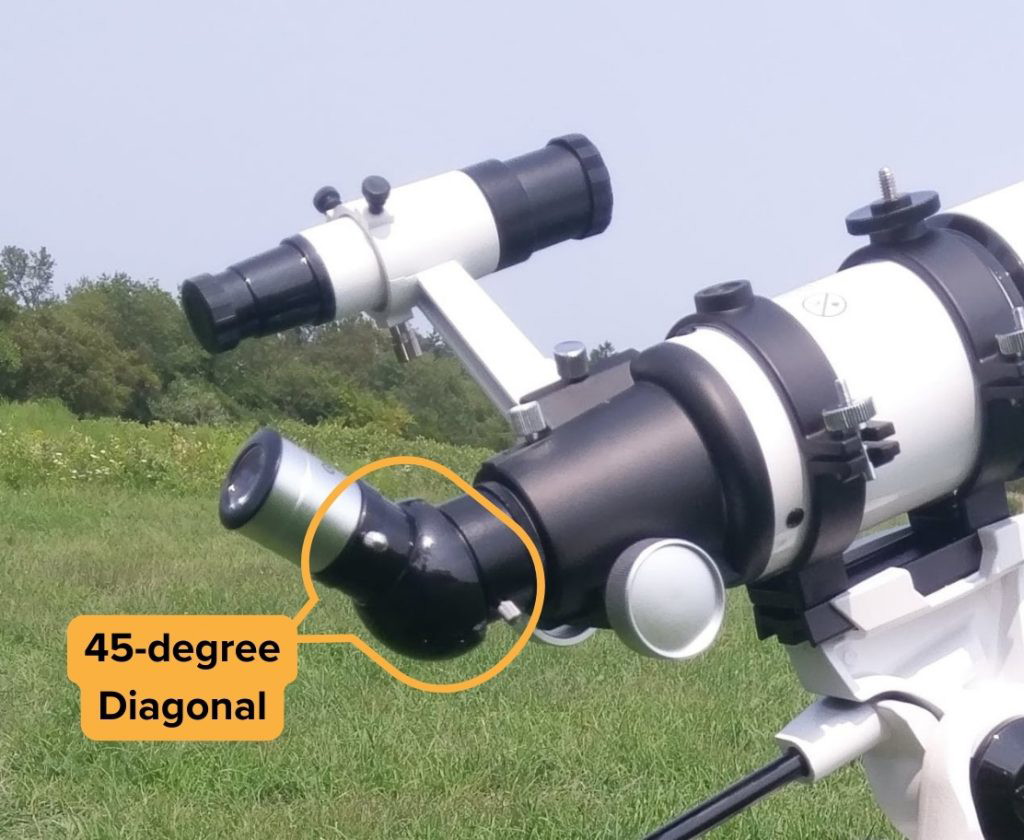
I have a second 90-degree diagonal that I use for astronomy, which makes it much easier for me to view high targets than if I were using a 45-degree diagonal. I just remove the 45 and slip in the 90 at night.
Refractor telescopes produce an image that is right side up but reversed left and right, so when considering a 45-degree diagonal for daytime use, look for one that is a “correct image” diagonal. This corrects the left and right images so that signs look right and boats on the lake are going in the correct direction. Binoculars and spotting scopes include these correcting features.
You can also use MCTs and SCTs as daytime spotting scopes. Just be aware that these tend to have very long focal lengths, and so the low-power magnifications may be too high to be practical for daytime use.
Check to see what the low-power capabilities of your MCT or SCT telescope are before you buy the correct image diagonal for daytime use. If the lowest you can go is greater than 40X, you may not find this optical tube practical as a spotting scope.
Maximum Practical Magnification for Daytime Use
Just as with nighttime “seeing”, we are limited by how much magnification we can use during the day because we are looking through the air. We get heat shimmers off the ground, and we get dust, humidity, and air pollution, which scatter the light. As a result, the magnifications used during the day are typically less than what we use for astronomy.
If you look at commercially available spotting scopes, most top out at around 60X. And most people use daytime magnifications of 50X or less to maintain the quality of the image.
Caring for Your Telescope
Check the bolts and screws on the mount periodically to be sure they are tight. If these loosen up, the mount will wobble, and the image in the scope will shake.
Typically, you want to do an alignment of the mirrors from time to time. This is a procedure called collimation. It is not hard to do, but, like anything else, it takes a little practice. Once you have done this a few times, you can complete the process in a couple of minutes. The trade-off for this higher maintenance is that Newtonian reflectors are the king of price per inch of aperture.
If you have been out on a night that is heavy with dew, leave the covers off the scope and your eyepieces when you put the scope away. Put them on the next morning, after everything has had a chance to dry.
Resist clearing the primary lens or mirror. If you keep the caps on, dust and dirt accumulation should be minor. A little dust on the mirrors or on the front lens has very little impact. But if you do a poor job of cleaning them, you can drag dirt and grit across the surface, causing damage to the coatings, and that can have a significant impact.
My Newtonian has had its main mirror cleaned once in 10 years. Check with your manufacturer as to what they recommend be used to clean the mirror or lens as they know best as to what will not damage the coatings.
Check to see that the bolts and screws that hold the base together are tight. If the mount sticks as you rotate the telescope, consider removing the bottom plate and cleaning it off. Dirt may have accumulated on the plate or on the nylon/Teflon bearings.
Keep the lens covers on and store them in a dry area, and you should have years of service with little care required. Wiping the dust off the outside is about all you will really need to do. My refractor has been cleaned once in 3 years. The optics should remain well aligned for the life of the telescope.
SCTs and MCTs include mirrors and lenses. While occasional alignments can be beneficial, many people go years between alignments. Like refractors, these are mostly closed systems and typically require very little care. Again, keep your dust covers on and store them in a dry location, and you should be fine.
Zane has written stellar articles on cleaning telescopes and also on storage and transportation of telescopes.
Upgrades and Accessories
When you buy your first telescope package, you will have enough to get you started. But over time, you may want to add things to enhance your observing experience.
- Eyepieces
- Eyepiece case
- Filters
- Upgraded diagonal
- Star charts
- Red flashlight
- Computer and phone apps
- Storage case
- Observing chair
There are a wide variety of optical accessories to consider. Generally, you don’t have to stick to the brand of the telescope for upgrades. But don’t run out and spend a lot of money right away. Work with what you have for a while. You will have a better idea of what you want after some time spent with your new telescope.
Eyepieces, filters, and diagonals are generally of a standard size, so you can mix brands. There is such a wide range of styles and prices that you can easily spend more on these accessories than you spent on the scope. But they can be used across a number of scopes. I use the same eyepieces on all four of my telescopes.
Join an Astronomy Club
There are a large number of astronomy clubs. If you do a search on “astronomy clubs” you will likely find a listing that can help you. Most clubs welcome visitors and are happy to have you attend a few meetings so you can get a feel for the club and the people.
Many astronomy clubs have public observing nights. Plan to attend some of these so you can speak to the members. Likely, you will find someone who knows your telescope and will be happy to help you.
A Few More Tips
Astronomy and telescopes can be a daunting topic, especially for beginners. But if you ease into it, you will find a great deal of enjoyment with your telescope without having to get too deep into the technical aspects. And, while there are lots of shiny trinkets out there, you don’t need a lot to enjoy the sky.
There are thousands of objects you can observe even with a 100 mm or smaller telescope. Start with the easy ones and work your way into the more difficult targets. And don’t forget to take into account your light pollution situation.
Many people in astronomy have more than one optical device. A common mix is:
- Binoculars
- A smaller grab and go scope – typically 130 mm or smaller
- A light bucket – typically 150 mm or larger
Wherever your first scope fits into this range, know that it can have a long and productive life. If you started big, adding something smaller for convenience later can be a good idea. If you started small, then adding that big scope can be something for a future date once you know how to operate a telescope.
And personally, I start every observing session with binoculars, scanning the sky and taking in the larger view that binoculars offer.
Remember that your eyes are your primary astronomy tools. Just look up!
I wish you clear skies!
Thanks for sharing, this is a fantastic blog article.Much thanks again
Glad you enjoyed it. If you have friends who are new to telescopes, share the link with them. I wrote it to help the new guys.
Thank you. Great new info, as I’m only a beginner. Gskyer 130. Really well explained.
Hey Ed, thank you for this guide! I am looking to buy a telescope for my dad, we are both new to this hobby so information like this is so helpful! I have been doing a lot of research online to purchase the best option at a budget. Mostly I’d like a telescope I can see Saturn and Jupiter with. Anyway, thank you and keep up the awesome work!
Thanks Jenny. Be sure to visit this article on buying your first telescope.
https://telescopicwatch.com/telescope-cost/
And this one on different types of telescopes
https://telescopicwatch.com/different-types-of-telescopes/
Never having had a telescope before, What would are there would there be in the $400 RANGE, IF ANY.
There are a wide variety of telescopes in the 300 to 500 range. You might want to take a look at these articles.
Buying your first telescope.
https://telescopicwatch.com/telescope-cost/
Different types of telescopes
https://telescopicwatch.com/different-types-of-telescopes/
A recent innovation that has come to the market from Celestron is the StarSense Explorer. Worth considering.
https://telescopicwatch.com/celestron-starsense-explorer-dx-102-130-reviewed/
Great article with valuable information for beginners, such as myself. After reading, I realize there are many things to consider for amateur astronomy. I just purchased my first telescope, a 90mm refractor and I am looking forward to my new hobby. Thank you for the informative post.
I can’t even get the moon into focus?
Len,
I am not sure what to say, Len. Is that a statement or a question?
Why can’t you get the moon into focus? You have provided no information so I can’t help you, but let me offer some thoughts that might be helpful.
Whatever scope you are using, put in your lowest power eyepiece. That is the one with the highest number. Use this as your finder eyepiece. Using this, in combination with the finder on your telescope, get the moon into your field of view.
1) Make sure you have your telescope actually pointed at the Moon. If you are using a red dot finder or optical finder, make sure you have this aligned to the telescope first. Just because the finder is pointing at the moon doesn’t mean the scope has it. The finder alignment process is best done during the day and is covered in the article. It may also be outlined in your telescope manual. But you can also find more information here:
Finder Scopes
https://telescopicwatch.com/how-to-use-align-finderscopes/
2) Once you have the Moon in the low power eyepiece, move the focuser in and out till it comes to focus. This should not be hard as the Moon is the easiest target to find. It is best viewed when it is high in the sky, not near the horizon.
3) Once you have it in focus in your low power eyepiece you can go to any other eyepieces you have. You may have to refocus as you change eyepieces.
I hope that helps.
Ed Anderson is one of my go-to guys when I need astronomy and observing advice (the other is Tony Flanders). Finding their advice is hit-and-miss for me because I don’t know how to follow people on web sites. However, I have learned more from these two guys than all other amateur astronomers combined. Neither of these guys are amateur astronomer snobs, letting people know their equipment and/or skills are not up to par. They both respectfully meet people with where they are at and bend over backwards to help other amateur astronomers. If there were ever to be a Mount Rushmore for amateur astronomers, these two guys should be the first ones carved into stone.