
A Barlow lens is an intermediate optical device that goes between the eyepiece and the objective lens or primary mirror. It is named after Peter Barlow, so you will often see it capitalized.
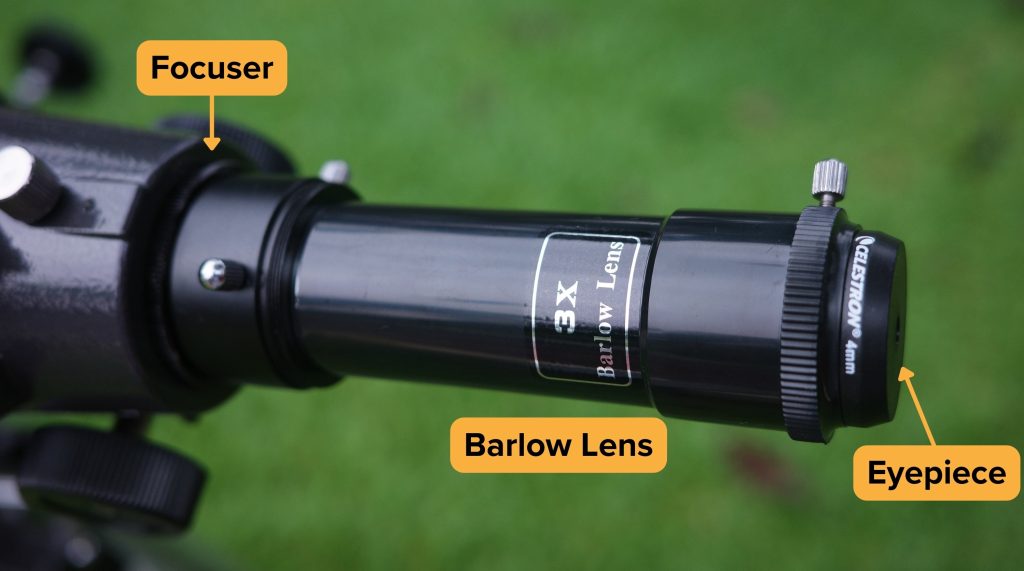
Commonly, Barlows come labelled with magnification indicators like 2x, 3x, e.t.c. If an eyepiece yields a 100x magnification, coupling it with a 2x Barlow would enhance it to approximately 200x. For visual use, Barlow lenses from 1.5X to 3X are common. Generally, Barlow lenses of greater than 3X are considered applicable to astrophotography.
How does a Barlow Lens Work?
We insert a Barlow lens in the optical path of a telescope to increase the magnification provided by any given eyepiece. In this way, a single Barlow lens can increase the effective number of magnification choices you have with your eyepiece set. It does so economically and can simplify your eyepiece needs.
While we often associate the Barlow Lens with the eyepiece, it is really more correctly associated with the optical tube. A Barlow lens is a divergent lens, which means that it moves the focal point out, effectively giving the telescope a longer focal length.
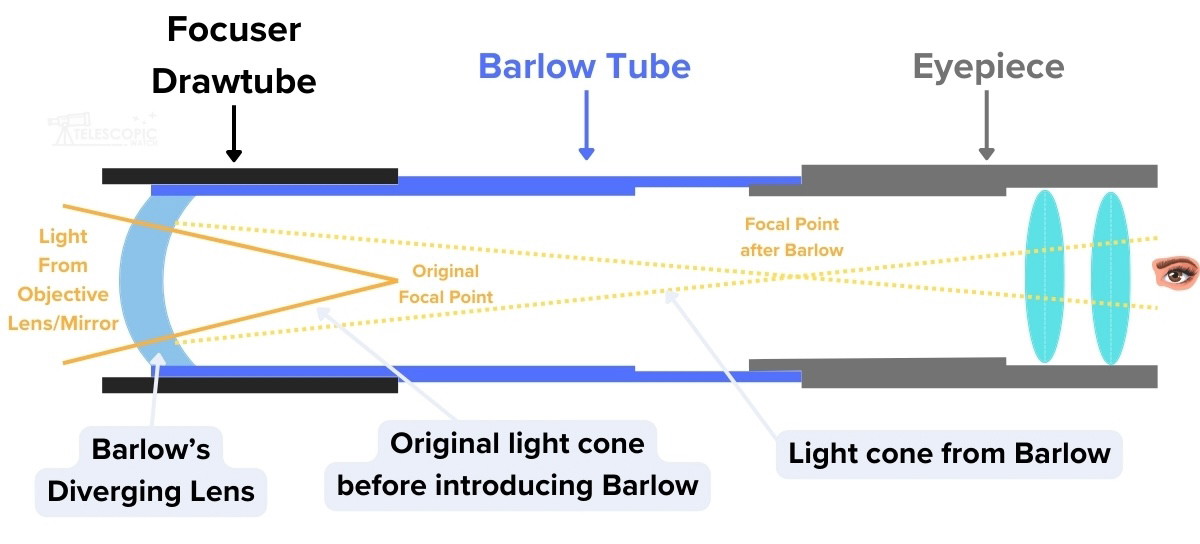
If your telescope has a 400 mm focal length, with a 2X Barlow inserted, it will effectively make the eyepiece behave like it would in a telescope with an 800 mm focal length. Since magnification = telescope focal length/ eyepiece focal length, the magnification doubles when the telescope’s focal length is doubled. In this way, each eyepiece can give two magnifications: one with and one without the Barlow.
But, in practice, we more often talk about Barlow lenses in the context of the eyepiece, as it seems more convenient to think of them that way. For example, you will read that a 2X Barlow will make a 10 mm eyepiece deliver the magnification of a 5 mm eyepiece. The net effect is the same (i.e., 2x magnification) whether you think of Barlow’s effect as halving the eyepiece focal length or doubling the telescope focal length. So it doesn’t really matter unless you’re particularly interested in how the Barlow lens works.
Another Reason to Use Barlows: Better Eye Relief
Eye relief is the distance you need to place your eye from the top lens to see the full field of view of the image. One reason to use a Barlow lens is to take advantage of the longer eye relief typically found in longer focal length, lower power eyepieces.
To illustrate, my 30 mm Plossl eyepiece have 22 mm of eye relief. If I wanted a 10mm Plossl for higher magnification, you would have to deal with around 7mm of eye relief. However, if I place that 30mm Plossl in a 3x Barlow, I get the equivalent magnification of a 10mm Plossl but retain the comfortable 22mm eye relief of the 30mm eyepiece.
Anything less than about 18 mm of eye relief may be difficult for eyeglass wearers who may not be able to get their eyes close enough to see the image fully. Anything less than 10 mm eye relief may be uncomfortable for some people since they would have their eyes almost on the lens, even if they don’t wear glasses.
Different Barlow Lenses Designs
Barlow lenses come in diverse design configurations.
1) In a conventional model, one inserts the eyepiece into the Barlow lens and then places the entire assembly into the diagonal, or focuser.
2) However, there are also Barlow designs that enable the Barlow’s lens housing assembly alone to be screwed directly onto the eyepiece, as shown in the below picture. These are often referred to as Barlow elements. You can either attach an eyepiece to the whole Barlow unit as usual or directly affix the Barlow element to the eyepiece or to the bottom of your camera/adapter.
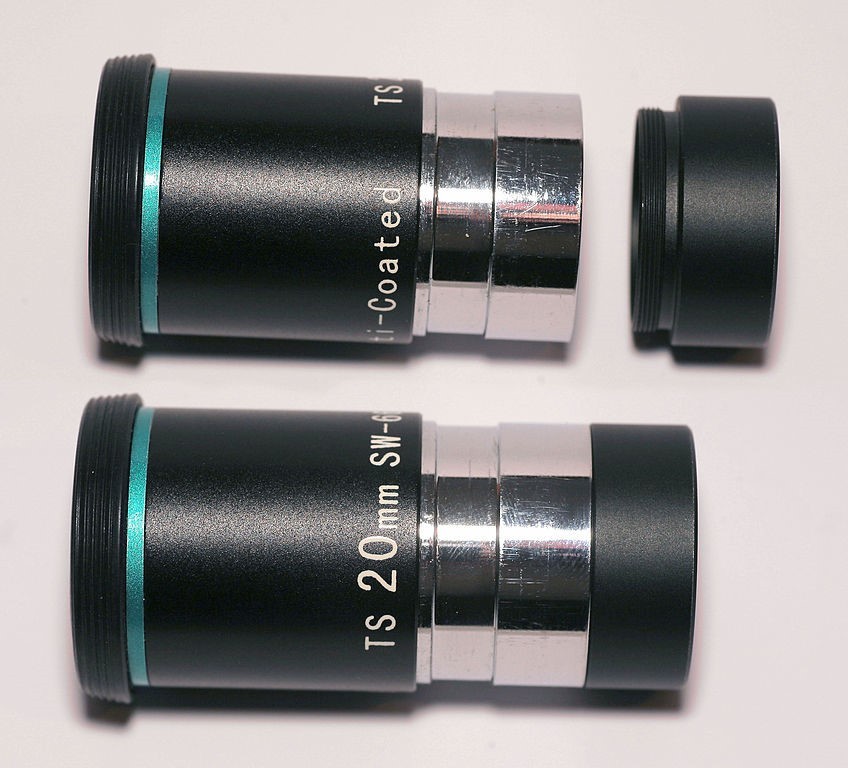
When used this way, you will get two different magnification factors. The combined Barlow unit might provide 2X, while the Barlow element alone on the eyepiece might provide 1.5X. This is caused by the fact that when the Barlow’s lens is closer to the original focal plane, the rays cannot diverge as much, leading to a weaker magnification effect.
3) I’ve also used some Barlows specifically intended to be threaded onto the ends of eyepieces. This is lighter and has a lower profile, but I felt it was less convenient as I’ve had to unscrew it and screw it constantly.
Lens Elements’ Quality & Performance
Barlow lenses can be based on a single lens element, two lens elements, three lens elements, and a few incorporate even four or five lens elements. Higher-end models also integrate exotic ED glass types to reduce chromatic aberration and other optical defects.
Similar to eyepieces, the lens elements of Barlow lenses can have edge blackening and various coating grades, with “fully multi-coated” being the best. These coatings and blackening techniques are engineered to minimize light loss and internal reflections.
Without going into a deep optical evaluation, let me share with you that the 2-element Barlow lens is more or less the industry standard. But counting lens elements won’t tell you which is best. You would have to compare them side by side in the same scope with the same eyepiece to know if one is better than the other in your application.
I would not recommend buying a single lens element Barlow. These are usually packaged with low-end telescopes. While they work, they often introduce optical aberrations. If you have one of these, use it until you can afford to replace it with something better.
Naturally, the more glass elements you add to the light path, the more light is lost as it passes through each element. I’ve seen some people object to the use of a Barlow lens for this reason. In the past, this may have been a valid argument. However, I believe modern design and optical coatings can reduce this to the point that any light losses in a quality Barlow are minimal and likely not noticeable in the eyepiece.
A Barlow should “disappear” in use, meaning it should not introduce optical aberrations or cause a loss of field of view by cutting off the edges of the image. If you use a 20mm eyepiece with a 2x Barlow, you should get an image that is very close to or equivalent to the image produced by a 10mm eyepiece of the same design. If you don’t, I’d consider the Barlow to be of poor design and quality.
Inserting and Using a Barlow Lens
Begin by inserting the Barlow lens into the focuser or the diagonal of your telescope. For those new to the world of telescopes, the focuser is the mechanism that adjusts the telescope’s focus, and the diagonal is a mirror/prism accessory that deflects the light path by 90 degrees, commonly found in refractors and Cassegrain telescopes. Once the Barlow lens is securely in place, introduce the eyepiece into the Barlow. This eyepiece is what you will look through.
For users of refractors, Schmidt-Cassegrains, and Maksutov-Cassegrain telescopes that traditionally incorporate a diagonal in the optical path, there exists an alternative setup to use a barlow lens.
Here, the Barlow lens is inserted directly into the focuser, or visual back. Subsequently, the diagonal can be placed within the Barlow lens. As always, the eyepiece is then placed on the diagonal, allowing you to observe as usual. This configuration may alter the magnification factor depicted on the Barlow lens. However, in some cases, you may not be able to reach focus at all, depending on how much additional travel your focuser can provide.
Using Barlows in Astrophotography
Barlow lenses are often thought of as halving the focal length of the eyepiece, and when coming up with a collection of eyepieces to use with a Barlow I’d encourage that kind of thinking. (I.e., a 6mm eyepiece with a 2x Barlow performs like a 3mm eyepiece on its own.) However, in truth, as shown before, the magnification increase is coming from extending the focal length of the telescope as much as it is from shortening the focal length of eyepieces. This means you can, in fact, use a Barlow lens with cameras as well as eyepieces.
(To clarify—when using a DSLR or Astro-camera for astrophotography, the telescope itself is being used as the “lens” of the camera. When imaging with cameras that have permanently attached lenses, such as a point-and-shoot camera or a smartphone, you’ll have to use eyepieces as you would when using a telescope visually.)
When doing lunar or planetary imaging with a DSLR, I think you’ll often want to use a Barlow, perhaps even a very strong one like a 3x or 5x, to reach an image scale where each pixel corresponds to the limit of the telescope’s resolution.
When I do astrophotography with a DSLR and one of my Dobsonians, I’m forced to be in a situation where I must use a Barlow. This is because I can’t get my DSLR to focus when I’m using a Dobsonian reflector, which is basically intended for visual use. The DSLR’s sensor is way too far back in the camera body from the Dobsonian’s focal point and I then often need to use a Barlow to move the light path outward enough. But due to the introduction of the barlow, the focal ratio (suppose f/8) becomes too slow (f/16 with a 2X barlow) and this basically restricts myself to the bright Moon and the planets at high power. I’m unable to image too dim objects due to the slow focal ratio.
Some screw-on Barlows are used with specialty equipment like binoviewers and DSLR cameras to shunt the light path out enough to be used in visual Dobsonians and other Newtonians, where there might not be enough inward travel in the focuser for those devices.
Would I Recommend Stacking Barlows?
It is possible to stack Barlows together. However, the actual magnification factor you get is not easy to calculate.
You might think a 2x Barlow on a 5x Barlow would result in a 10x Barlow. But because the exact magnification factor depends upon the spacing of the Barlow versus the eyepiece, there is no simple equation for figuring out the magnification of a stacked Barlow.
For example, a 2x on a 5x would have a very different magnification than a 5x on a 2x. (If my memory serves right, the latter had a far higher power.)
Because of the maximum useful magnification of a telescope, you will almost never find a situation that requires stacking Barlows. But if the telescope has a very low focal ratio, the seeing is incredibly steady, the optics of the telescope and barlow lenses and eyepieces are all very good, and you want to try to squeeze as much detail as possible out of a bright planet or the Moon, you could try stacking more than one Barlow and just seeing what happens.
That said, I don’t recommend planning an eyepiece collection based around stacking Barlows. There are too many unknowns, and you’ll never know for sure what magnification you’re actually using.
Where can a Barlow lens be helpful?
- When you don’t have an eyepiece at the magnification you want to use.
- When you want to retain the long eye relief of a low-power eyepiece at high power.
- When you want to stretch your eyepiece budget, effectively doubling your eyepiece set.
I usually recommend that new people on a tight budget get the best Barlow they can get their hands on to provide maximum flexibility at the lowest cost. You can always add more eyepieces later, but if you have a Barlow, each of those eyepieces will provide two magnifications.