

The C6 Optical Tube’s Features I Like/Dislike

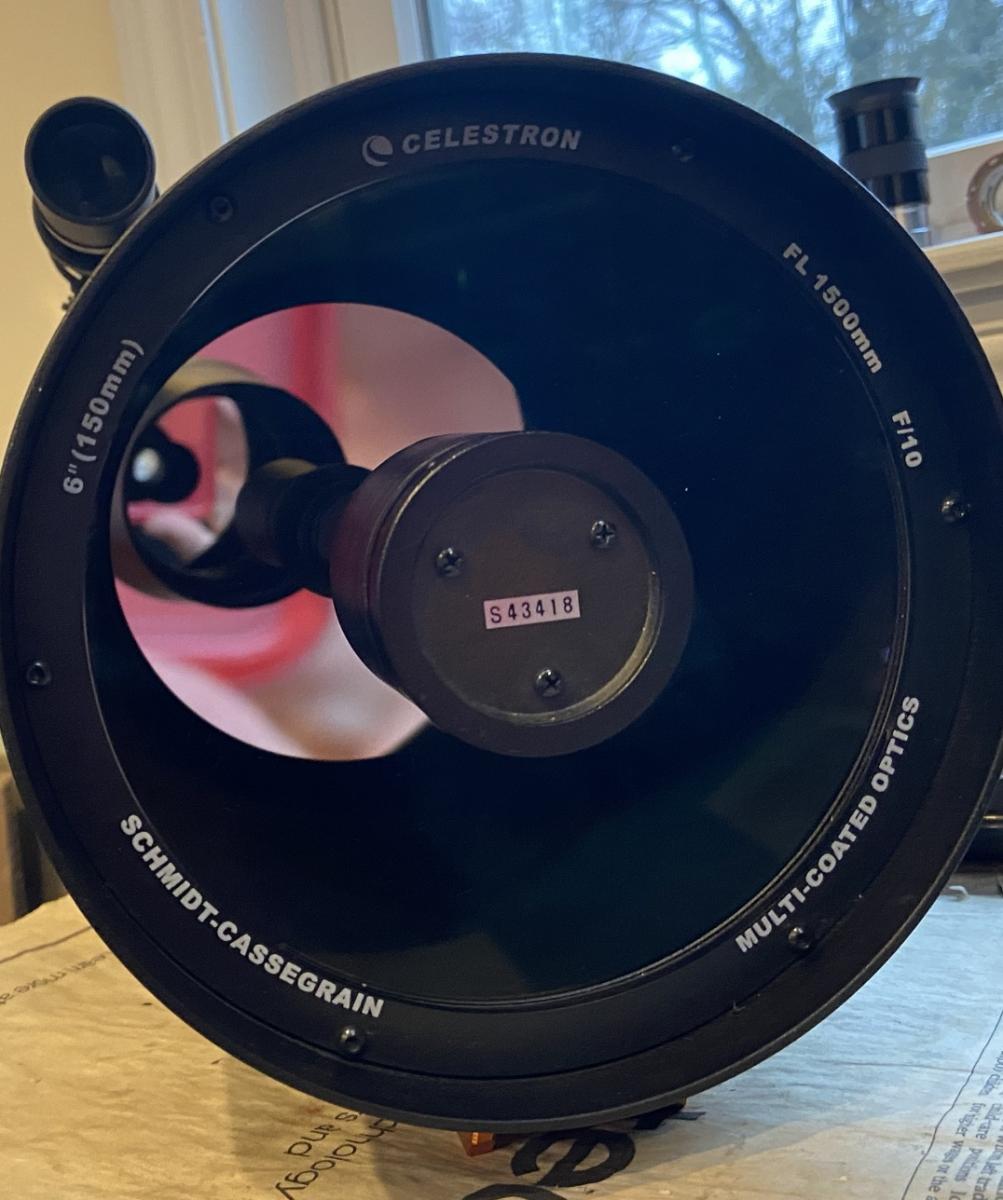
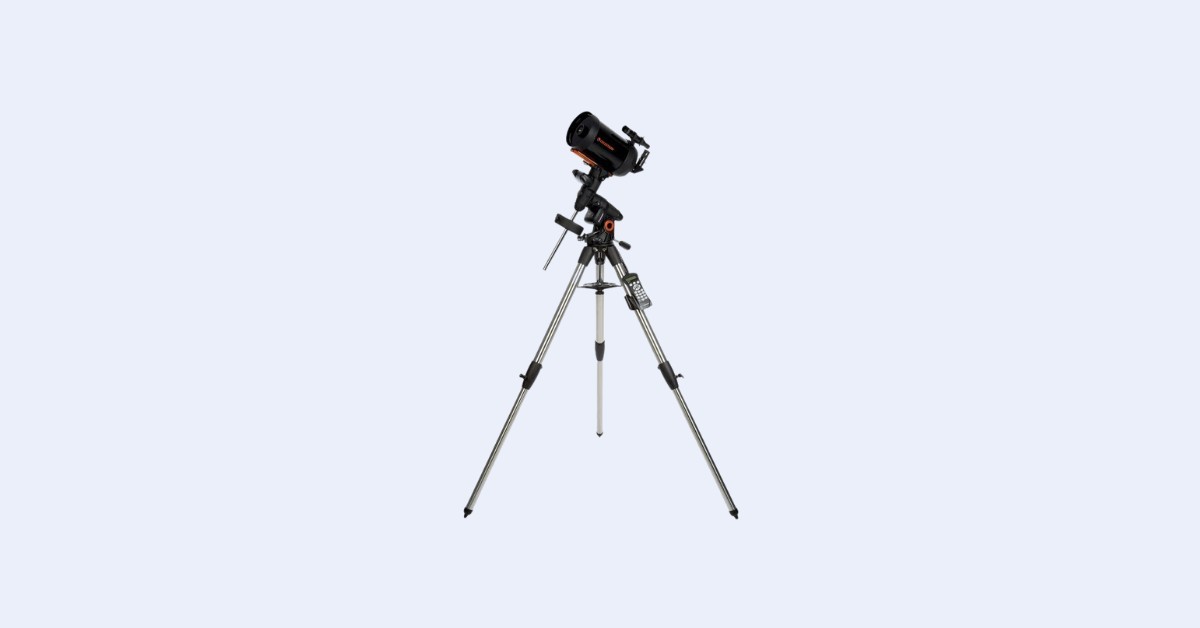
The Advanced VX 6” SCT package uses Celestron’s C6 XLT optical tube, a 6” (150mm) aperture Schmidt-Cassegrain with a focal ratio of f/10 and a resulting focal length of 1500mm. The C6 has never been sold in any configuration other than with the XLT mirror coatings.
Being debuted in 2005, the C6 XLT is the newest of Celestron’s Schmidt-Cassegrain telescopes. The C6 is marginally heavier and bulkier than the older C5, but the C6 features significantly better optical quality as well as more light-gathering and resolving power.
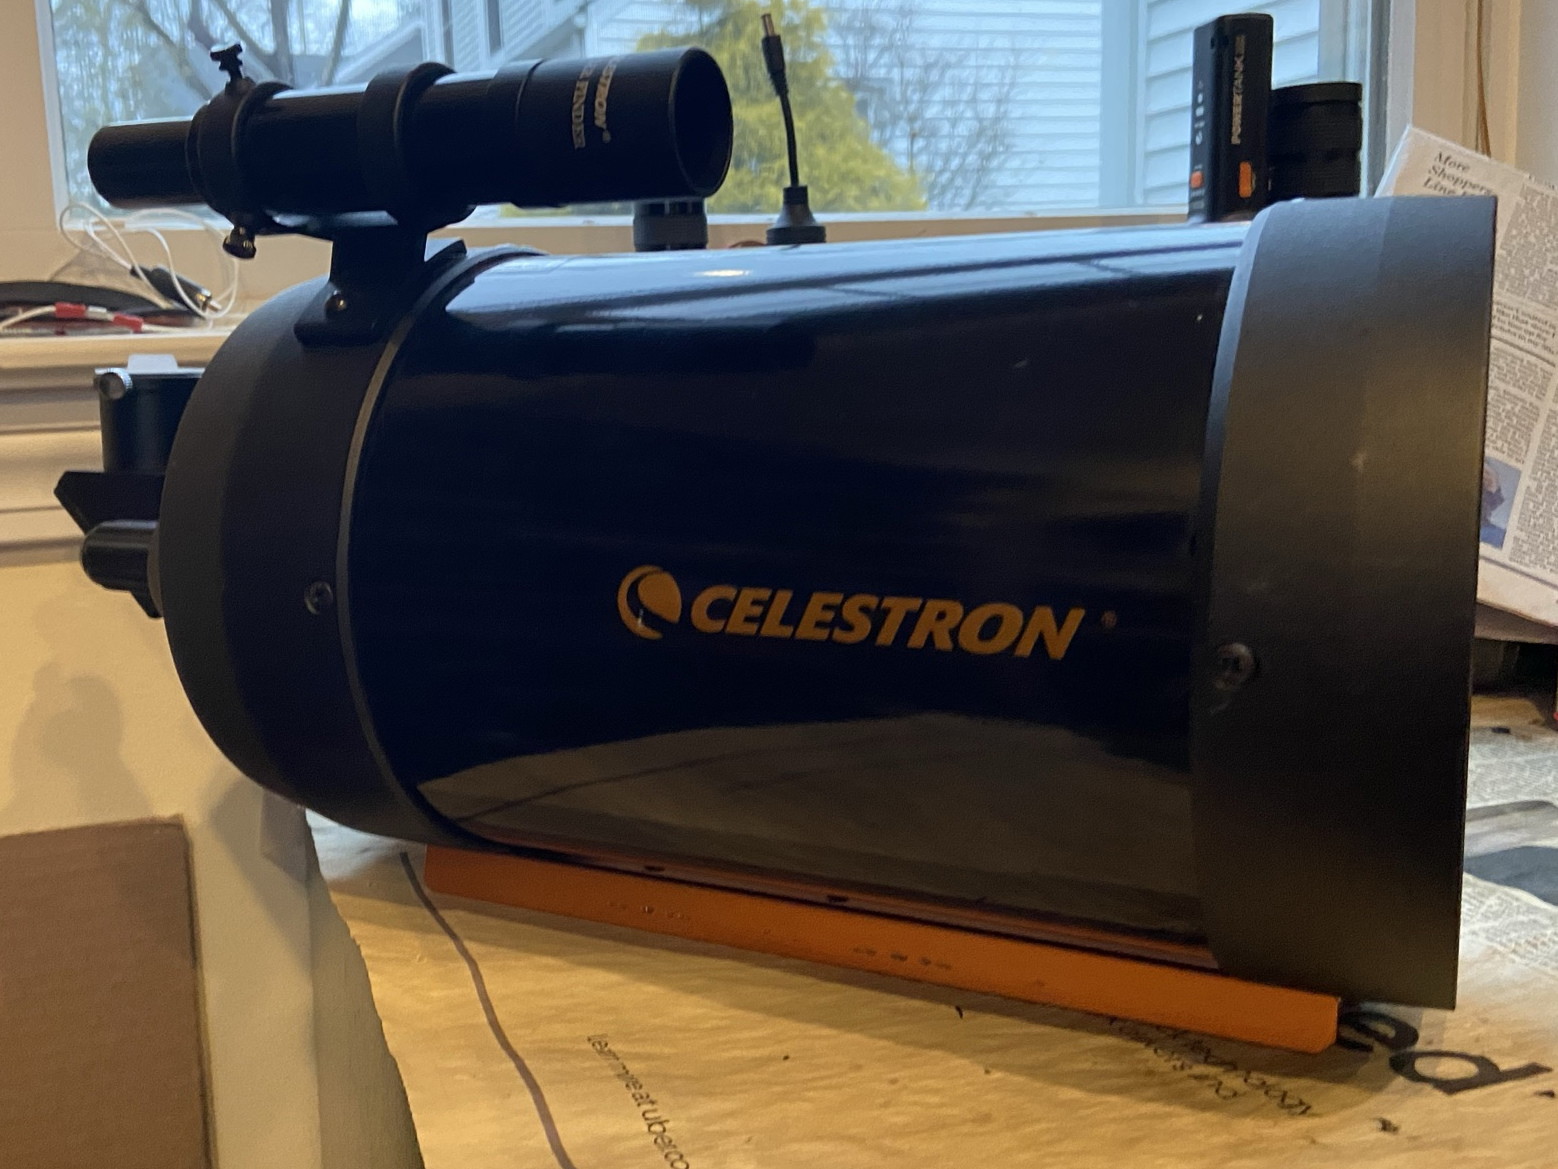
Like many other catadioptric telescopes, the C6 XLT uses a knob on the back of the telescope to focus the primary mirror by moving it backward and forward inside the tube. This can sometimes cause “image shift” when focusing, which is especially a problem at high magnification or when doing any kind of astronomical imaging. However, I came to realize that the C6 XLT suffers little from this issue, in part due to the minimal size and weight of the primary mirror.
Any Schmidt-Cassegrain telescope requires regular collimation by adjusting the secondary mirror, but I found collimating the C6 XLT to be a fairly quick and easy process, and I also don’t have to do it every time I set it up.
The C6 XLT has a standard threaded port at the back of the optical tube that allows for the use of Schmidt-Cassegrain accessories and adapters, such as an f/6.3 focal reducer. The small size of the interior baffling of the C6 XLT means that I’ve got vignetting problems if I use an f/6.3 reducer with a large camera sensor or for visual use. The same is true if I try a 2” diagonal. As such, the true field of view of the C6 XLT is limited to a hair over 1 degree in the sky—not very wide for a 6” telescope.
The bottom of the telescope has a dovetail plate in the style of a Vixen (the orange color bar that you see in the above pictures), which makes it easy for us to connect the optical tube to almost any astronomical mount or tripod.
The Hyperstar Compatibility for Better Astrophotography
Like all of the newer Celestron Schmidt-Cassegrain telescopes apart from the C5, the Advanced C6 XLT has HyperStar compatibility. I’ve seen some of the older C6 XLT optical tubes to be not compatible with the Starizona HyperStar system, though.
With HyperStar compatibility, I can remove the secondary mirror from the front of the optical tube, install a Starizona HyperStar f/2 lens, and convert the telescope into a super-fast f/2 Schmidt camera with a 300mm focal length.
However, the C6 XLT only works with relatively small sensors in its HyperStar configuration. This is due to both the physical sensor illumination constraints and the fact that a large camera housing in front of the optical tube can obstruct a significant portion of the telescope’s aperture.
The Decent Set of Accessories
The Celestron Advanced VX 6″ SCT package includes a 25mm, 1.25” E-Lux Plossl eyepiece, which provides a magnification of 60x with the C6 XLT. Its 52-degree apparent field of view translates to a 0.86-degree true field in conjunction with the C6 XLT, or a little less than twice the angular diameter of the full Moon in the sky.
You’ll need additional eyepieces for higher magnifications. A slightly lower-powered eyepiece to squeeze out a wider field of view for deep-sky objects might also be worth the investment.
You also get an excellent quality 1.25” prism star diagonal, a 1.25” visual back to insert the diagonal or a camera, and a 6×30 finder scope for aligning and aiming the telescope.
The Advanced VX Equatorial Mount
If you want a computerized German equatorial mount but don’t want to spend too much, in my opinion, the Celestron Advanced VX mount is a good choice. It is suitable for visual astronomy or planetary imaging with telescopes weighing up to 30 lbs. and accepts optical tubes with Vixen-style or Celestron CGE-style dovetail plates.
While the Advanced VX can handle long-exposure deep-sky astrophotography with a C6 telescope if I use a f/6.3 reducer or a f/2 HyperStar conversion, it is still not the best choice for dedicated imaging purposes. The Sky-Watcher HEQ5 Pro or EQ6R is a better option for such a task; either mount has superior gearing. Of the three, EQ6R is a lot more steady than the Advanced VX or HEQ5. My full review of the Advanced VX mount goes into some of the drawbacks of the Advanced VX for deep-sky astrophotography.
A single 11-pound counterweight is required to balance the Advanced VX with the C6 XLT and that provides plenty of additional margin for heavy accessories such as eyepieces.
The Advanced VX can be powered by either AC or DC connectors, but only a cigarette lighter DC cord is included by default. You can also use a MicroUSB cable to connect the mount to your PC and use software to control the mount directly through its ASCOM drivers or to update the controller’s firmware.
Setting up and Using the Advanced VX 6″ SCT
The Advanced VX equatorial GoTo mount is easy to set up and use, though there are more steps and moving parts than a simple alt-azimuth GoTo mount. First, I need to assemble the mount and install the counterweights and optical tube. Then I need to balance the telescope on both the right ascension and declination axes by sliding the tube and counterweights.
After putting together and balancing the C6 XLT for the first time on the Advanced VX, I marked the dovetail on the optical tube and the counterweight bar on the mount to remember where to place the counterweights and optical tube for proper balance.
After the telescope and mount are fully assembled, balanced, and leveled, I need to polar align the mount. This is done with a polar scope or polar alignment system like a PoleMaster, either of which is to be purchased separately. You can also use the Celestron All-Star Polar Align system for polar alignment, but I found this to be more complicated. If you are not using All-Star Polar Align, there is no reason to power up the mount until it is properly polar aligned.
After polar aligning and powering on the mount, I need to input the date, time, and location and align the Advanced VX’s GoTo system on 2 or 3 alignment stars.
Provided I have perfectly leveled, aligned, and balanced the C6 XLT and Advanced VX, the mount is a rock-solid platform for the relatively small telescope placed atop. GoTo and tracking accuracy for visual use should be spot-on.
However, inaccuracies can build up over time, which I compensate for by using the Sync function on the mount to add additional alignment stars (or even whatever object I’m currently viewing) and re-calibrate the mount.
The Advanced VX’s hand controller contains a database of some 40,000 objects, many of which are uninteresting to me or beyond the reach of the C6 visually.
Should I buy a Used Celestron Advanced VX 6″ SCT?
If you have the opportunity to purchase a used Advanced VX 6″ SCT package at a reasonable price, it can be a good investment as long as you thoroughly check the condition of the equipment.
One thing to be cautious of is a broken front corrector plate, which cannot be repaired or replaced without also replacing the primary and secondary mirrors “matched” to it; this costs more than simply purchasing a new or used C6 XLT in working condition.
It is also extremely important to ensure that both of the mirrors in the C6 XLT are free of significant corrosion, as recoating is similarly too expensive to bother with. Also, ensure the front corrector plate in the telescope is free of fungus, which can permanently damage the glass by chemically etching it.
On the other hand, a faulty Advanced VX mount can be replaced or repaired; if the mount head itself is non-functional, you can usually find a used mount head to place atop the tripod for much less than the cost of a full new set of a tripod, mount, and hand controller. A missing or broken hand controller is also fairly trivial to replace, along with counterweights or accessories like the finder, visual back, eyepiece, and star diagonal.
Alternative Recommendations
I found the Celestron Advanced VX 6″ SCT hardly the best deal in its price range and considered a bigger telescope for my visual use or buying an a la carte setup for imaging.
Under $1000
- The Explore Scientific 10” Hybrid Dobsonian has far more aperture and thus better performance than the C6 XLT, and has a compact form factor when disassembled, making it a breeze to store and transport, though assembly is a bit time-consuming and the included accessories are far from great.
- The Sky-Watcher Virtuoso GTi 150P has the same overall performance as the C6 XLT, along with fully motorized tracking and GoTo with the ability to aim the telescope manually and control the mount with your smart device. Its collapsed tube and mount hardly take up more space than the C6 optical tube alone.
- The Celestron StarSense Explorer 8” Dobsonian has a simple, sturdy, and easy-to-aim Dobsonian mount assisted by Celestron’s StarSense Explorer technology to help you navigate the night sky. It’s also fairly easy to set up and transport, with the entire telescope able to be easily carried in one trip by an adult. A 10” version is also available at a higher price tag.
$1000-$1500
- The Apertura AD12 has double the aperture—and thus quadruple the light-collecting power—of the C6 XLT, a variety of included accessories, and the simple Dobsonian mount is a breeze to set up, though the telescope is quite bulky and heavy.
- The Apertura AD10 is a lot more compact than its 12” counterpart but features the same basic design and accessories with plenty of advantages over the C6 XLT.
- The Celestron NexStar 6SE has the same C6 XLT optics and provided visual accessories as the Advanced VX 6” SCT package, but it is considerably more portable and quick to set up as well as a lot less expensive for the same performance.
$1500-$2400
- The Sky-Watcher 12″ FlexTube Collapsible Dobsonian outperforms the C6 XLT easily in performance and the collapsible tube makes it a lot more portable. A GoTo version is also available.
- The Sky-Watcher 10” GoTo Collapsible Dobsonian is more compact than a solid-tube 10” Dobsonian – although not by much – but adds fully motorized tracking and GoTo, controlled via your smartphone or tablet and allowing you to freely aim the telescope manually as well.
- The Celestron NexStar Evolution 6 is largely similar to the NexStar 6SE, likewise sharing the C6 XLT optical tube, but slightly more stable and with added perks like a built-in battery and the ability to control the telescope with your smartphone or tablet. The 8” Evolution model is a similarly excellent choice.
- The Celestron Advanced VX 8” SCT is hardly less portable or significantly more expensive than the C6 XLT but has much better performance that’s more worthy of using the Advanced VX mount in the first place, as the 8SE package is wobbly and the Evolution 8 is rather expensive.
Aftermarket Accessory Recommendations
The 25mm E-Lux Plossl provided with the Advanced VX telescope packages does not offer the full field of view achievable with a 1.25” eyepiece, which matters a lot with a long focal length instrument like the C6 XLT. A 32mm Plossl (47x) allows you to get a 1.1-degree true field; a focal reducer or 2” eyepieces will vignette too much to be of any use in achieving an even wider field of view thanks to the C6’s limited baffle tube diameter.
At f/10, even the cheaper wide-angle eyepieces available will be tack sharp in the C6 XLT. A 15mm SWA (100x) or 14mm Explore Scientific 82-degree (107x) makes for a great medium-power ocular, though the latter is more immersive and can be used with faster instruments too. The C6 XLT can handle up to 300x magnification on a good night, though atmospheric conditions will limit you to lower powers much of the time. A 6mm “goldline” (250x) or Explore Scientific 6.5mm 82-degree (231x) is ideal for viewing detail on the Moon, planets, double stars, and the smallest deep-sky objects like planetary nebulae.
For almost any telescope of 6” or greater aperture, we recommend adding a UHC nebula filter, such as the Orion UltraBlock, to enhance the views of nebulae through your telescope by increasing contrast. It will mitigate the effects of light pollution on your views of these objects, though the best views are still obtained under dark skies, and the UHC will help even under good conditions by darkening the background sky.
The C6 XLT’s thin Schmidt corrector plate cools quickly and is prone to attracting dew, even in fairly dry climates. Dew not only fogs up your image but can also cause chemical damage to the corrector lens and its optical coatings due to the acidity and chemical impurities of most dew. A dew shield prevents condensation from forming and acts like a lens hood to keep the worst stray light, bugs, and accidental fingerprints off the corrector. A heated dew shield might be necessary for particularly humid environments or long nights, and this will also require you to purchase a dew heater controller, which can power additional heaters for your eyepieces and finder scope.
The Advanced VX mount does not come with a polar scope; rough polar alignment by sighting through the empty polar axis hole or using Celestron’s All-Star Polar Align can suffice for visual work, but you will find yourself frequently syncing the mount again and again throughout the night. Precise polar alignment is essential for astrophotography work. Celestron’s stock polar scope is usually recommended, or you can get a more expensive tool such as a PoleMaster for even more reliable alignment.
To power the Advanced VX mount and any other electronic accessories, such as a motor focuser or dew heaters, a rechargeable DC power supply, or AC power cable, is necessary. Battery options include the Celestron PowerTank Lithium or PowerTank Lithium Pro, which can also be attached to the tripod legs. You can also save money by getting a cheaper power supply like those sold by Talentcell and simply securing it to a tripod leg with zip ties, duct tape, or bungee cords.
Observing with Advanced VX 6″ SCT
A 6” telescope like the C6 XLT with Advanced VX pales in comparison to a similarly priced 8”, 10” or even 12” dobsonian reflector when it comes to deep-sky viewing capabilities, particularly under light-polluted skies, which limits what types of objects and details can be seen to begin with at any aperture.
The limited field of view achievable with the C6 XLT, thanks to its long focal length and 1.25”-only accessories, also rules out observation of the largest open star clusters and nebulae.
However, even under so-so conditions with the C6 XLT, I can still have enjoyable views of medium-sized clusters like M35 and M38, as well as begin to resolve the brightest star clusters, such as M13, into individual stars.
Planetary nebulae, such as the Cat’s Eye and Blinking Planetary nebulae, show slight details as well as greenish and bluish coloring, along with the larger but colorless Ring (M57) and the gigantic Dumbbell (M27). A UHC nebula filter serves to make planetary nebulae stand out at lower magnifications before taking a closer look at high power, as well as increase contrast on nebulae like Orion (M42) and the Lagoon (M8), which shine with a filter and/or dark skies, though they can be seen unfiltered as well.
Thousands of double stars can also be split with the C6 XLT’s razor-sharp optics and are easily located in the Advanced VX mount’s database.
Dark skies are absolutely essential for viewing galaxies, and the C6 XLT can show high-contrast dust lanes in ones such as M64, M82, and M104 and begins to show hints of not-quite-resolved spiral arms in galaxies such as M51 at low magnification. I can also view many galaxy groups and clusters; the Virgo Cluster of galaxies is chief among them, with dozens of members.
The C6 XLT’s high-quality optics and long focal length make it ideal for planetary viewing, though its large central obstruction and small aperture are still limitations.
Good collimation, allowing the telescope to cool to ambient nighttime temperatures, and stable atmospheric conditions are also essential for getting sharp views of the planets, lunar details, and other small targets.
I can easily resolve the phases of Mercury and Venus, polar ice caps and dark surface features on Mars when it’s at its closest to us, and plenty of fine detail such as craterlets, mountains, and ridges on the Moon.
The C6 XLT can also show me the cloud belts, the Great Red Spot, and other atmospheric features of Jupiter, along with the disks and shadows of its four large moons, the Galilean moons, whenever they transit in front of the giant planet.
The rings of Saturn, the Cassini Division in them, Saturn’s own dull cloud belts, and a handful of moons can be seen as well.
The C6 XLT lacks the light-gathering power to show the moons of Uranus and Neptune and I had a hard time resolving the disks of either ice giant, while Pluto is beyond the reach of a 6” telescope owing to its dimness.
Astrophotography Capabilities
While the C6 XLT can be used for deep-sky astrophotography with the Advanced VX, assuming it’s reduced to a focal ratio of f/6.3 with a focal reducer and a suitable autoguider is used, I’m pushing the limits of the mount and often run into vignetting or mirror flop issues with the telescope.
A Starizona HyperStar allows me to shoot with the C6 at f/2 focal ratio and 300mm focal length, which is hardly a problem for the Advanced VX even if it’s unguided. But the HyperStar is expensive, and I’m limited to using certain one-shot-color CMOS cameras with this configuration.
I believe that an 8” RASA is a better choice if I want to shoot at f/2 and a similar focal length, or I’d rather stick with a smaller refractor or Newtonian reflector astrograph designed for imaging.
Planetary imaging is best with an 8” or larger telescope with greater resolving power, but the C6 XLT does a good job despite its limited resolution.
I use a 2x to 3x Barlow lens to boost the scope’s focal length to between 3000mm and 4500mm and to achieve optimal image scale. I’d then get my laptop and plug in a high-speed planetary video camera (which can also double as a guide camera should I decide to dabble in deep-sky imaging), so that I can get great shots with the C6 XLT of the Moon, Venus, Mars, Jupiter, and Saturn from my backyard in just a few minutes of shooting under good seeing conditions and suitable processing of the footage later on.

Thank you! great information.