
The easiest way I check my telescope’s focus is by pointing it at a bright star. Stars are ideal for this purpose because they are distant enough to be considered a point source of light.
A star in perfect focus appears as a single, round point of light through the eyepiece. If it appears considerably larger than a point source at a normal magnification, the telescope is most probably out of focus.
Slightly blurry/fuzzy stars can be caused by problems unrelated to being out of focus, such as being miscollimated or using too high a magnification. My article, “Why Are My Telescope Views Blurry?” goes into more detail.
If I’m still confused, I’ll intentionally defocus the telescope slightly by turning the focuser. As I move it out of focus, I’ll see the star’s light spread out.
In a telescope with a central obstruction (like a Schmidt-Cassegrain or a Newtonian reflector), I see the star expand into a ring with a dark center (the “donut” effect). More on this follows in the next section.
In a refractor or an unobstructed reflector, the star just blooms into a larger circle of light.
- Adjust the focuser until the diffraction pattern (ring or circle) is symmetrical around the center.
- Once symmetrical, move the focuser slowly to make the pattern smaller until it collapses back into a sharp point, indicating optimal focus.
If I’m using a camera, the star should appear as the smallest possible point in the image I get. Larger, blurred spots indicate that the focus needs adjustment.
Are You Seeing a Bullseye Through Your Telescope?
Many telescopes have a central obstruction (the secondary mirror) that blocks some light. When such a telescope is out of focus, a distinctive “donut”-shaped image can be observed.
This is because when the telescope is out of focus, the light rays from a star are not converging at the focal plane. Instead, they spread out, forming a circular pattern. The secondary mirror or obstruction in the optical path blocks the central portion of the incoming light rays. This results in a lack of light in the center of the circular pattern, creating the “donut” appearance.
The size and shape of the out-of-focus disk can indicate how far the telescope is from being in perfect focus. As focus is adjusted, the “donut” will shrink and eventually collapse into a sharp point of light when proper focus is achieved.
The out-of-focus disk itself shows rings—diffraction rings—that can be used to star test a telescope.
Can’t See Anything? Focus Travel or Back Focus Might Be the Culprit
It’s a common issue for both beginners and experienced astronomers to sometimes find that they can’t see anything through their telescope.
This problem can often be attributed to issues related to focus travel and back focus. Before checking those, make sure you have taken the telescope’s caps off and started with a low-power eyepiece that doesn’t give too much magnification.
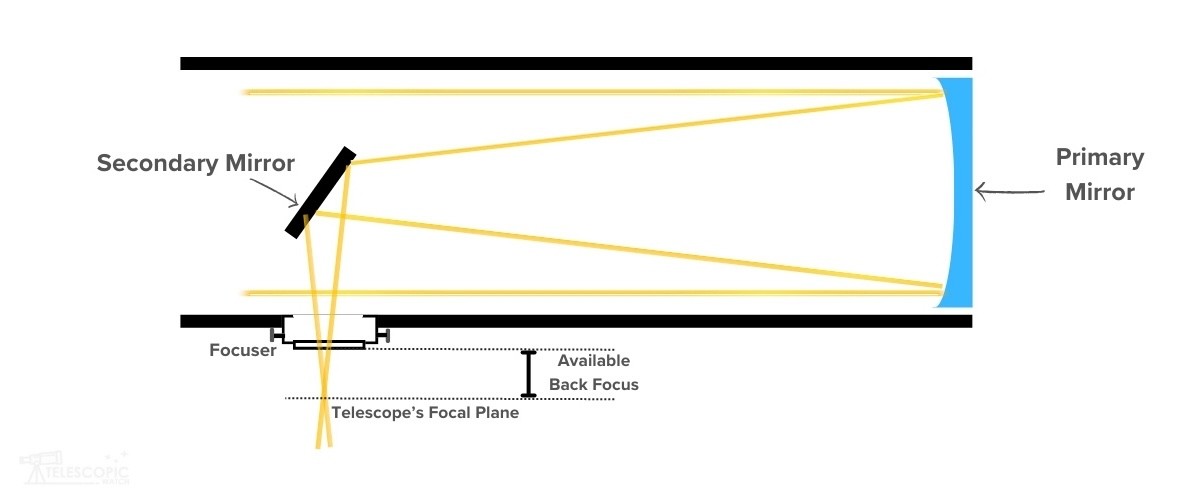
Back focus (or back focal distance) is the distance from the edge of the focuser (which its fully pushed in) to the focal plane of the telescope (the point where light converges to form a sharp image). It’s essentially the maximum available “space” for attaching camera sensors, eyepieces, and other optical accessories while still being able to achieve focus by moving the focuser outward. See the below figure.
Different telescope designs offer varying amounts of back focus, influencing what types of cameras and accessories can be used.
A typical refractor or Newtonian astrograph offers 2-4” of back focus, while the difference in focus among a fairly diverse set of 1.25” and 2” format eyepieces rarely equals more than an inch, so most telescopes designed purely for visual observation only need about 1.5” of focus travel.
When the Total Optical Length of Accessories Is Less than the Back Focus
Point your telescope at a terrestrial object at least a football field away—or, if one isn’t available, use the Moon. Slowly rotate the focuser in one direction. It might take several turns before anything recognizable appears in the eyepiece, especially if the focuser is far from the proper focus point. You may also need to turn it in the opposite direction as well.
Many catadioptric telescopes can require considerable focuser travel due to their moving-mirror focusers. I often have to extend them quite far out to reach focus if they were setup unusually by the previous owner or if they were shipped with the focus racked all the way in from the factory.
If you’re unable to achieve focus by moving the focuser out, it could be because the eyepiece/camera/accessory (or combination thereof) you’re attempting to use is outside the focuser’s travel range—meaning your setup can’t reach the necessary back focus distance by itself.
Some telescopes, especially those designed for astrophotography, might require an extension tube to reach focus with an eyepiece. Most refractors are designed to reach focus only when a star diagonal is used.
When the Total Optical Length of Accessories Is More than the Back Focus
In astrophotography, cameras, filter wheels, and other imaging accessories require a certain amount of back focus to work correctly. Insufficient back focus can prevent these devices from reaching the focus point where a sharp image is formed. In such cases, we may then need additional imaging accessories such as spacing focal reducers, field flatteners, and mechanical adapters or filters—which can be a huge headache.
If you find yourself unable to move focus sufficiently inward (a common problem for astrophotographers), you may have hit a physical design limitation of the telescope. This might mean you require a different focuser or adjustments to the length of the tube, or even a Barlow lens to bring the focal plane out, which may not work for your intended use case. This was mostly inevitable with the many binoviewers that I’ve used.
On the whole, most Newtonian-reflecting telescopes—and often refractors—that aren’t designed primarily with long-exposure astrophotography in mind won’t reach focus with a cooled astro camera, DSLR camera, or binoviewer at prime focus.
If you are doing deep-sky astrophotography, invest in the proper optical tube designed for it. It’s worth it.
Using Bahtinov Mask as A Focusing Aid
A Bahtinov mask is a focusing aid designed to fit over the front aperture of a telescope. It is typically made of a thin, opaque material like plastic or cardboard and features a specific pattern of slits. This pattern creates a diffraction effect on bright stars, which aids in achieving precise focus.
You can buy a Bahtinov mask from sites like High Point Scientific for various telescope apertures, cut one out of plastic or cardboard, or 3D-print one yourself.
When you place a Bahtinov mask over the telescope’s aperture and point it at a bright star, the slits create a distinctive diffraction pattern of spikes, like the spikes created by the spider in a reflecting telescope. This unique pattern usually consists of three sets of lines: one central set and two symmetrical sets on either side. As you adjust the telescope’s focus, these lines shift in relation to each other.
The key to using a Bahtinov mask is to adjust the focus until the central line of the diffraction pattern is exactly in the middle of the other two lines. When these lines intersect precisely at one point, you have achieved perfect focus.
I find this process to be typically easier to observe through a camera connected to the telescope, where the pattern can be seen on a screen. However, using an eyepiece, one can also do it by eye.
The high precision of the Bahtinov mask makes it particularly useful for astrophotography, where focus needs to be exact. It is neither particularly useful nor necessary for most visual work.