
Astrophotography is an extremely dedicated hobby, one that requires significant financial and time investment to do right. It requires a lot of work to get good results for anything other than wide shots of the Moon and maybe the planets, and it’s an entirely different beast than visual observing. In this article, we’ll mostly be covering deep-sky astrophotography, which is what the vast majority of amateurs are interested in.
When I talk about astrophotography, I am referring to photographing deep sky objects (DSO’s)—namely galaxies and nebula. Planetary photography requires different considerations. If you want to just shoot the Moon and planets, we recommend reading our Best Planetary Telescopes article and connecting a CMOS planetary imaging camera to whatever you buy-that’s all you need.
If you don’t want to read the whole guide, below is a list of the five best telescopes for astrophotography. Take a look and see which one you’d like to be your personal companion as you discover and map the wonders of the universe.
Best Astrophotography Scopes Overview
- Around $500 (Choice A): Sky-Watcher Evoguide 72 – Simple and easy to use, works on almost any mount.
- Around $500 (Choice B): Orion 6” f/4 Newtonian Astrograph – Another best choice for beginners. Fast focal ratio doesn’t need long exposures
- $700-$1100 (Choice A): Sky-Watcher ProED 80 – Massive performance improvement compared to above choices. Quality optics and long focal ratio mean easier to get nice images of medium to small targets
- $700-$1100 (Choice B): Orion 8” f/4 Newtonian Astrograph – A great scope to image with. Big aperture and fast focal ratio is a great combo.
- Around $1250: Sky-Watcher ProED 100 – Doesn’t need a flattener right away, long focal length great for galaxies, no collimation needed.
Before going deep into our telescope recommendations, let’s discuss some of the basics of deep-sky astrophotography. Deep-sky astrophotography is different from visual astronomy in a number of ways. Here are some big ones.
1: Astrophotography is a la carte
When shopping for an entry-level telescope for visual astronomy (i.e., looking through the eyepiece), you are generally buying a single product, which means you can at least get by with no additional purchases besides maybe a couple of eyepieces. Not so with astrophotography.
Deep-sky astrophotography, at a minimum, requires a telescope optical tube assembly (the part that actually gathers and focuses light), a precise computerized equatorial mount, and, of course, a camera. You really should also invest in a guide scope, autoguider, and a quality laptop to control your whole setup with; the former two are things we’ll cover in this review along with the big three components.
2: Astrophotography isn’t necessarily all about larger aperture the way visual astronomy is
The vast majority of beginning astrophotographers start out with a telescope under 6” in aperture, considered by most to be a puny size for visual astronomy. However, one can produce fantastic results with a telescope as small as 50mm or even a wide-angle telephoto lens.
It is important to understand that, unlike in visual astronomy, where aperture rules, for deep-sky astrophotography, optical speed (related to focal ratio) rules. Some of the greatest astrophotography pictures ever taken were done using a small camera lens, so size is not the primary consideration.
The need for speed is the result of how signal-to-noise-ratio (SNR) is measured. Compared to daylight targets, deep-sky objects are extremely dim. The more photons we capture in our pixels during our available time under the stars, the better our picture will look. We measure the number of photons captured in terms of SNR. More photons counted in the pixel equals more SNR. More SNR makes for a smoother picture. Optical speed refers to how fast the photons are flowing through the system and getting into our camera’s pixels. The faster, the better.
While fast optics can increase “signal,” reducing noise involves other considerations. Reducing noise can best be accomplished by photographing under dark skies without light pollution, or by using special narrowband filters.
Speed is indicated by the focal ratio. The focal ratio is the focal length divided by the aperture. Speed changes by the focal length squared. So, an f/4 system is 4x faster than an f/8 system.
3: Astrophotography has a higher cost of entry than visual astronomy
The bare minimum you need to get a decent astrophotography telescope and mount (if you’re not shopping used) is about $1000, assuming you already have a suitable DSLR camera – figure a few hundred extra bucks if you haven’t obtained one yet. Compare this to visual astronomy, where a decent telescope can be obtained for 3/10th of the price. Sure, you can slap a camera on less-expensive telescopes with simple clock drives, but don’t expect great results or a very upgradable setup.
4: Astrophotography has a difficult learning curve
Astrophotography also requires a lot of practice before you can get great results. With visual astronomy, after just a couple nights you can spot tons of planetary and lunar details, and with practice, deep-sky observing will become easy.
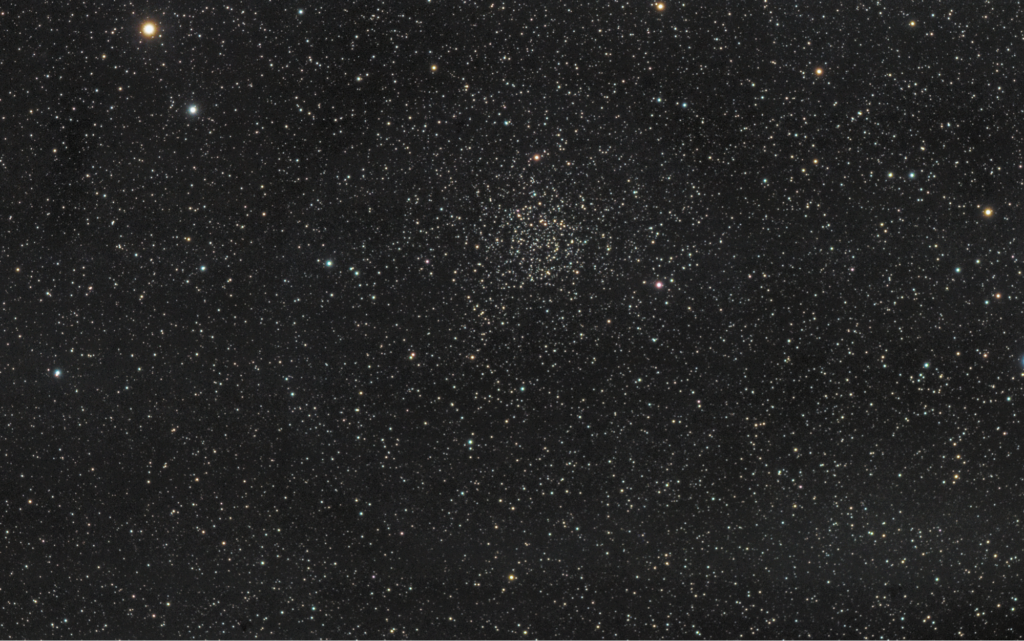
On the other hand, I have seen astrophotographers with rigs costing as much as a new Tesla (!) who do not seem to understand the fundamentals of image processing. Contrary to what many neophytes seem to believe, there is more to image processing than just boosting the brightness/contrast. I would recommend practicing on somebody else’s raw image data before you even go outside to take your own pictures. Processing, not equipment, is often what makes the difference between a bad or mediocre astro-image and an Astronomy Picture of the Day. You can get great results with a modest setup and horrible results with the best telescope in the world. It all depends on whether you’re willing to take the time to learn what you’re doing.
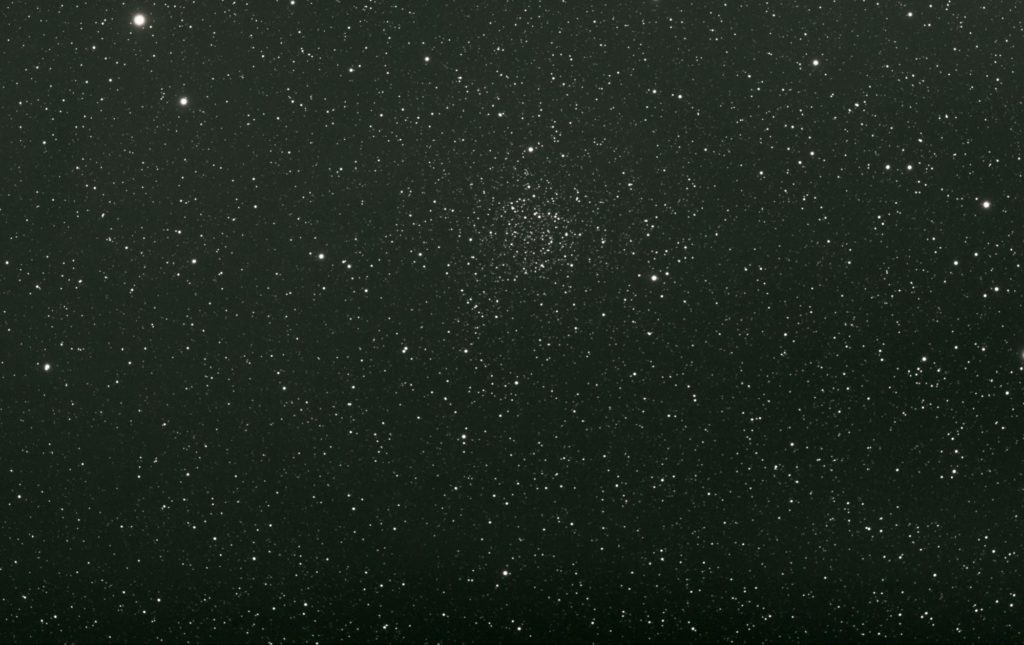
Bad (above) versus good (below) processing. Same data, radically different results.
5: A good astrophotography telescope is not always a good visual telescope, & vice versa
Computerized German equatorial mounts—a de facto necessity for serious deep-sky astrophotography—are also great for visual astronomy. However, it’s a different story when it comes to the telescope itself. Here are some examples of why some of the popular types of visual astronomy telescopes might fail for astrophotography:
A short, inexpensive achromatic refractor is a fun visual telescope, but the purple bloating it produces on stars in astro-images will be an eyesore. So a good refractor for astrophotography must use ED glass (a kind of lens) to control chromatic aberration. Many ED refractors made for astrophotography have optimizations and compromises which end up making them poor choices for visual astronomy (particularly their abnormally high weight), though most are at least acceptable.
A fast Newtonian reflector meant for visual astronomy will typically have as small of a secondary mirror as possible to minimize contrast loss. However, Newtonian astrographs can have secondary mirrors almost half the size of the primary, and often it’s impossible to reach focus with an eyepiece in them without additional accessories! A visual Newtonian, with its smaller secondary and visual-optimized focal plane, will struggle to illuminate or reach focus with most deep-sky cameras or DSLR chips.
A Ritchey-Chretien telescope is a great choice for astrophotography of galaxies and small star clusters. However, with its massive secondary mirror, off-axis aberrations, and the focal plane distance, a Ritchey is a pretty poor choice for more than quick glances at the sky. A Schmidt-Cassegrain telescope’s off-axis aberrations, as well as the troublesome mirror flop and image shift, make it a more difficult – though not useless by any stretch – choice for astrophotography, while for visual use they’re quite good.
With all this said, let’s get on to what equipment you specifically need.
The Best Telescope Type for Beginner Astrophotography
- Refractors as Astrophotography Scopes
Refractor type telescopes are great for a beginning astro-imager. Since you basically don’t have to deal with collimation, flexure, or cooldown, you’re much more likely to get good images starting out with a refractor than with a reflector. Furthermore, refractors at small apertures are much lighter in weight than Newtonian reflectors, so you don’t need as big of a mount.
However, refractors aren’t perfect. An achromatic refractor may be acceptable for visual astronomy, but the chromatic aberration of an achromat will result in bloated and purple-rimmed stars in your astrophotos. Thus, you need to spend money on a refractor that at least possesses extra-low dispersion (ED) glass, or preferably a triplet if you can afford it. Most less-expensive imaging refractors also suffer from field curvature, which can make it look like you are zooming toward or away from the center of the image at warp speed, like in Star Trek. This problem can be solved with a relatively inexpensive field flattener, however.
Refractors sold for astro-imaging typically have either short focal lengths or long focal ratios due to their small apertures. The result is that you are either stuck with a telescope that has too low of a focal length to go after small targets, or something that requires long exposure times to capture as much due to its long focal ratio. There’s also the problem of dew accumulating on your objective lens.
- Newtonians as astrophotography scopes
Fast Newtonian reflectors like the kind used for astrophotography require extremely precise collimation, and a coma corrector is almost mandatory. Ritchey-Chretien reflectors are even harder to collimate than fast Newtonians, and a field flattener like the kind used in a refractor is preferable; although they do not suffer from coma, the field of view in your images can be curved and may give the impression that you are headed toward the target object at warp speed.
Flexure and loss of focus while imaging is also a bigger problem with both major reflecting telescope designs compared to refractors, and a reflecting telescope also typically needs time for its mirror to acclimate to cool outdoor temperatures. For all practical purposes, small refractors have basically instant cooldown time under most conditions. A large Newtonian or pretty much any Ritchey-Chretien will require autoguiding due to the weight and long focal length of such an instrument, which further adds to the cost – don’t be fooled by the cheapness of the scope itself!
However, both Newtonians and R-Cs have big advantages over refractors. A fast Newtonian will allow you to capture far more with a given time exposure than with a small refractor, and a Ritchey-Chretien’s long focal length makes it great for imaging small targets like globular clusters and galaxies. Both designs will, of course, have superior resolution to a small refractor thanks to their usually-large apertures, and reflecting telescopes don’t have to deal with dew nearly as much as refractors do.
- Catadioptric telescopes as astrophotography scopes
Catadioptric telescopes carry many drawbacks for astrophotographers. Maksutov-Cassegrains are out of the question due to their super-long focal ratios, while Schmidt-Cassegrains suffer from image shift and mirror flop. Unless you can afford an expensive EdgeHD, Rowe-Ackermann Schmidt, or corrected Dall-Kirkham telescope, catadioptric telescopes are probably not a good idea for beginners to image with.
All things considered, for beginner astro-imagers, I would really recommend a refractor telescope for astrophotography over a reflector just due to the ease of setup and use. But if you must get a reflector, I would recommend a 6” or 8” f/4 Newtonian like the ones listed below. Ritchey-Chretiens are great scopes, but you really need to learn how to do astrophotography with something simpler and easier to use first – this might be one of the refractors listed below, which could double as a guide scope piggybacked on your R-C later.
Best Telescopes For Astrophotography: Individually Reviewed
1. Sky-Watcher Evoguide 72 APO – Choice A in $500 range

- Refractor design needs no collimation
- Small size means almost any mount is up to the task of carrying it
- Short focal length is not demanding on mounts or focusing
The Evoguide 72 is basically the same as the other low-cost 72mm ED doublet refractors—they’re all made in the same place.
The Evostar is great for wide-field deep-sky imaging, with a focal length of just 420mm. However, its low-cost objective lens means it doesn’t have the best color control nor the sharpest images, and combined with its short focal length, you can basically forget about doing much serious imaging of globular star clusters, nor of galaxies beside M31 and M33 (or the Magellanic Clouds if you live near or south of the equator).
Even though the scope does lack a finder, with such a short focal length, you don’t really need one. It is basically a large finderscope in itself.
With such a low focal length, low cost, and low weight, the Evoguide 72 is a really great astrophotography scope to get started with. However, as with low-cost mounts, don’t expect a scope like this to last you too long once you get into serious imaging. You get what you pay for. But for its price, the Sky-Watcher Evoguide 72 is one of the best beginner astrophotography telescopes you could get.
2. Orion 6” f/4 Newtonian Astrograph – Choice B in $500 range
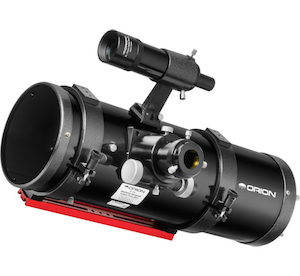
- Works okay for visual astronomy if you stick an eyepiece in
- Fits most mounts
- Large aperture and long-ish focal length allow for more options for imaging targets
The f/4 Newtonian astrographs sold by Orion are all rebadged versions of the generic GSO Newtonians you can find under various other brands. Orion claims their 6” f/4 has additional reinforcement beneath the focuser unlike other models, but this may or may not matter to you as a beginner.
The 6” f/4 Astrograph has a claimed weight of 12.7 pounds. But once you add a guide scope, camera, and coma corrector, the weight is going to probably pass 15 pounds, which means you’re on the verge of outgrowing an HEQ5-class mount.
Keep in mind that thanks to its fast focal ratio, the 6” f/4 Astrograph will show coma across much of the field of view, especially with larger camera sensors. The fix for this is to get a coma corrector, which adds more weight, expense, and complexity to your setup. However, it’s worth it for the improvement in the quality of your images.
3. Sky-Watcher ProED 80 – Choice A in $700-$1100 range
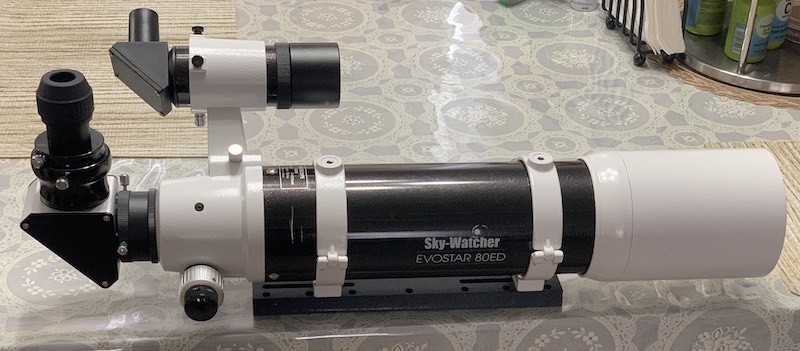
- Works well for visual astronomy and comes with all needed accessories
- Fits most mounts
- Less fuss to get pleasing images
The Sky-Watcher ProED 80 may be only a little bigger and more expensive than the Evoguide 72, but it boasts massive improvements in performance.
For one, the ProED’s focal ratio is f/7.5 as opposed to the f/5.8 of the Evoguide. While it will take you longer to get the same amount of data for a given object, the ProED 80’s longer focal ratio means that the edge of the field of view is much better looking without purchasing a field flattener. And with 600mm of focal length, you can actually get some decent images of galaxies and globular star clusters—the ProED 80’s higher optical quality also enables this.
The ProED 80 is also a fantastic visual telescope, should you prefer to look at the sky with your eyeball rather than a camera, at least some of the time. It comes with a 2” star diagonal, a couple eyepieces, and a nice big 9×50 finderscope to enable visual use right out of the box.
4. Orion 8” f/4 Newtonian Astrograph – Choice B in $700-$1100 range

- Not as much of a strain on mounts/guiding as 8” catadioptric or R-C telescopes
- Built-in cooling fan, high quality focuser make setup quick
- Works great for eyepiece views too
The 8” f/4 Newtonian Astrograph is a nice astrophotography telescope – and a surprisingly good one for visual use as well. It’s a surprisingly affordable and good scope for astrophotography. It’s basically a scaled-up version of the 6” version, and thus without as much of the balancing issues (and it also includes a cooling fan, which the 6” f/4 Astrograph lacks).
The only major downside (beside the inevitable coma) is this scope’s weight. Orion claims a weight of 17.5 pounds, but in actuality, with the included 50mm finderscope, it’s about 20.3 pounds – removing the finder will bring it down to 19.3, but adding a guide scope, camera, coma corrector, etc. will result in at least a 24-pound rig. So the 8” f/3.9 Newtonian Astrograph is really at home on an EQ6-class mount or bigger.
While it does require a big, heavy-duty mount, the Orion 8” f/4 Newtonian Astrograph is a great scope to image with, even for those just getting started in the hobby.
5. Sky-Watcher ProED 100 – Choice above $1200

- Sharp optics
- Long focal ratio means flatter field
- Good for galaxies, globular clusters, other smaller targets – and for visual too!
The ProED 100 is similar in most aspects to the 80mm version, apart from the larger aperture and longer focal ratio. At f/9, however, it is going to require rather hefty exposure times as it is the slowest scope on this list. The good news about it being an f/9 is that you should be able to get fine photos without a field flattener. Additionally, 0.85x reducer/flattener combos are available to bring the scope’s focal ratio down to f/7.65, though spacing your camera correctly with such devices can be difficult.
At about 9 pounds, the ProED 100 is still easily capable of fitting on an HEQ5-class mount, though the long tube is more likely to be affected by wind.
If you don’t mind the rather long tube and resulting focal ratio, the Sky-Watcher ProED 100 is a fabulous instrument for both visual and astrophotographic use.
Astrophotography Telescope Accessories
Field flatteners
As I mentioned earlier, field flatteners fix the weird elongation of stars you get at the edge of the field of view with most refractors. You might be able to see it at the left and bottom edges of this image I took without a flattener:
Don’t see it? Here’s a close-up:
If you think this is obnoxious, you should see what a starfield, nebula, or the Andromeda Galaxy looks like. It is like you are flying toward the center of the field at lightspeed. The effect is worst of all on full-frame DSLR cameras and with fast refractors. The scope I did this with is a relatively slow 76mm f/8, so the field curvature isn’t as bothersome as with a faster instrument.
Field curvature occurs to a lesser extent in Ritchey-Chretien reflectors, so if you’re using one of those, you may benefit from a flattener as well.
Our two recommendations for flatteners are:
- Orion 8893 Field Flattener – Inexpensive, works well, but you may have to play with the spacing using thread-on extension tubes and adapters.
- Explore Scientific Field Flattener – Works great, spacing is usually a nonissue with DSLR cameras.
There are also focal reducer/flattener combos, but they are more sensitive to spacing and do not offer quite the same edge-of-field correction as regular flatteners.
Coma correctors
A coma corrector is really a necessity for astrophotography with a fast Newtonian reflector. Without one, stars at the edges of your images will appear as fuzzy “seagulls” and you will either have to ignore them or crop the image.
Here are our coma corrector recommendations:
- Baader Planetarium MPCC – Lowest Price, Choice Under $250:
The Baader MPCC is a decent coma corrector, but it adds spherical aberration to your telescope. Depending on your camera, the resulting optical defect may or may not be visible. People swear by the MPCC, but I would recommend getting a better corrector if you can afford it.
- Explore Scientific HR Coma Corrector – Choice Between $250 and $450:
This coma corrector is great because not only does it not add spherical aberration, but it can also be used with an eyepiece should you want to look through your telescope, and it accepts 2” filters. The top is also unable to adjust the coma correction precisely.
- Tele-Vue Paracorr II – Choice Above $450:
The Paracorr is the first widely-available and, simply, the best coma corrector out there. It has superior mechanics and light transmission, as well as better correction than the ES HR unit. Highly recommended.
Power Supplies
Unless you are powering your rig via a wall socket (AC current), you will need a big, hefty battery to run at least your telescope and possibly your computer and camera too.
For those with small budgets and those interested in a more portable setup, we recommend the power supplies below. However, if you have more to spend and/or a hefty vehicle, you might be better off with a deep-cycle marine battery or the like.
- Celestron PowerTank – Choice Under $100
This battery is cheap and, with 2 ports, can easily power your scope and a computer (provided you use an inverter). However, the lead-acid design will only last you 5 years or so until it can no longer hold a charge, and using an inverter is going to suck up a lot of power. However, this battery comes with bonus features: In an emergency, you can jump your car with it, and it has both a red flashlight and a white LED spotlight.
- Celestron PowerTank 17 – Choice Between $100-$200
This is basically the same as the smaller PowerTank but with a heftier battery and a built-in radio, if you want to listen to the radio while imaging or something. The radio can be useful on those nights when the weather isn’t very certain and you need to listen to the weather radio.
- Celestron PowerTank Lithium Pro – Choice Above $200
This battery may not have all the bells and whistles of the regular PowerTank and only have one cigaret lighter port, but it has a smaller DC port and cable to power most mounts. It has the same capacity as the PowerTank 17 but with the advantage of running on LiFePO4 technology, which will last you decades. It is also small enough to be strapped to your mount’s tripod legs and comes with a strap to do so. Lastly, the Lithium Pro includes USB ports to charge your smart devices.
Cables, Adapters, and Miscellaneous Items
With any astrophotography rig, you’re going to need cables and other electrical devices. There are so many possible setups just based on the equipment we’ve listed that it’s impossible for us to cover everything or give specific recommendations, but here are some of the things you’ll need:
- Camera control cable (if using a DSLR with a computer) or intervalometer
- Mount control cable (if plugging your mount into your computer), either RS-232 or EQDIRECT
- AC or DC power port for mount
- Adapter for your laptop to charge from a portable power supply
Additionally, you’ll probably want an additional dovetail to piggyback your guide scope on top of your main telescope, and clamps or screws to attach said guide scope to the dovetail.
Software
For almost any deep-sky imaging, what you are typically doing is taking exposures anywhere between 15 and, typically, 120 or so seconds and stacking them. For stacking, you need a software program, and for almost everything else, that’s DeepSkyStacker. DSS is free, and it allows you to stack images and add calibration frames, as well as do some very simple and basic image processing. However, for real processing, you need more than just DSS.
Most people begin image processing with the free software GIMP or use Adobe Photoshop. While these programs are great to start out with—especially for those already familiar with daytime photography and image processing—they are limited in the ways they can improve astronomical imaging. A better solution is PixInsight. The 60-day trial is free; the full version is quite expensive but well worth the money.
Another piece of software you might want to consider is NINA. NINA – a free, open-source software application – can allow you to automate your entire imaging setup, to the point that all you need to do is polar align, focus, and then select objects and exposure length. It even star aligns your mount for you!
Recommended Reading
The following books are often cited as great resources for both beginners and more advanced photographers.
- The Deep-sky Imaging Primer, Charles Bracken
- The Astrophotography Manual: A Practical and Scientific Approach to Deep Sky Imaging, Chris Woodhouse
Conclusion
Building an astrophotography setup takes lots of thought to get everything to mesh together. A good astrophotography setup is a cohesive system where every piece of equipment has features that complement each other. We hope that this article made this process easier by explaining some of the ways that equipment needs to fit and what equipment you need to get started as easily and hassle-free as possible.
thanks for the great review. As a total beginner, I just wonder which of the recommended scopes is the easiest to handle? Also do they all come with a mount that as GOTO capability? GOTO Polaris for proper alignment?
thanks in advance!
Matt
All of these scopes require a mount of some kind which we have a separate guide for: https://telescopicwatch.com/best-telescope-mounts-for-astrophotography/
If you are just starting out in astrophotography I would recommend getting any of the refractors. Collimation and coma aren’t issues, flexure is less of a concern and they tend to not need as big of a mount or as accurate guiding.
Hi Zane,
I have read many of your reviews, BUT this particular article made me think that as an entry level amateur (despite having planned to finally get started so for many years) i was perhaps not approaching it the right way at all. The much higher prices that you mention for a somewhat decent astrophotography start has been a block on me actually getting started. I’m now thinking that if I’m to invest a bit, I should then start (alongside my 9 y.o. kid) with a decent deep observation piece instead of jumping right into astrophotography. Based on your views (no pun intended) I’m probably better off investing in a quite decent visual-only piece at a fraction of the price. So my question is, should I be careful to over invest too much right off the start and begin with something middle of the road and work my way up instead of overextending myself too early on? I’m considering something above entry level in good part because I’m in New England and we have above average light pollution here even between towns on most nights. Should I stick to something not past the $450 range, “learn the ropes” and then gradually upgrade my way up later?
Once again, thank you so much for all your outstanding work!
Start with visual (8″ Dob) or get a star tracker for your DSLR like the Star Adventurer and think about the rest later.
Hi Zane,
I want to get a telescope for my daughter who will be new to telescopes and astrophotography. Can you recommend one for under $250 please?
Thanks so much,
Lisa
Forget any serious astrophotography at that price.
My recommendation would be a 6″ Dobsonian (Sky-Watcher 6″, Orion XT6, Orion Skyline 6, High Point DT6) or 5″ tabletop Dobsonian (Sky-Watcher Heritage 130P, Zhumell Z130)
Thanks for the great information! Any thoughts on pros/cons of using a RedCat 51, Zenith Star 61 or similar small refractors for astrophotography?
I see no reason not to, other than that the longer focal length of the larger refractors gives you more options for smaller targets.
The price ranges listed here are not accurate. For example, the Sky-Watcher ProED 100 – Choice Between $640-$900 actual range is $1500-2000 on Amazon
Prices of almost all the telescopes, that are on stock, are over the roof due to covid and the recent demand surge.
It’s a hobby that has exploded in 2020 . But that will calm down and we will see the equipment availability grow on the used end of it . 2005 I bought a 11” sct and a atlas eqg Mount . Gray blobs got boring after a while so sold it . 9 months ago I bought a celestron C8 and cgemll. That just before I discovered astrophotography. People on fb groups said it’s only good for planetary work then someone said get the focal reducer corrector for it . I did . My galaxy images and nebula images from a bortle 2 are amazing and better then many posted on the same fb groups . So you are right the refractor is the way to go the , learning curve for gimp is insane oh and I have a spacecat . But no mention of mounts . Put some advice on that topic . Just about everyone going deep down the rabbit hole will want to start autoguiding , only a few mounts in the mid price range are good for it . My cgem not being one of them .
Super thanks I was redirected here by a post on CN.
Detailed, easily explained, more like a friend than a scientist.
Would the Nikon Z9 work well for astrophotography? My other camera is a D750. If not why?